Capture Tips: screenshot on an ipad
Learn how to screenshot on an ipad with simple steps, pro tips, and techniques for polished App Store assets.
Taking a screenshot on your iPad is one of those things that feels like muscle memory... until you switch models. The key difference all comes down to one thing: does your iPad have a physical Home button?
For iPads with a Home button, you'll press the Top button and the Home button at the same time. On newer models without a Home button, like the iPad Pro or the more recent iPad Air, the combo is the Top button and the Volume Up button.
A quick press is all it takes.
Mastering the iPad Screenshot
While taking a screenshot seems basic, the method has changed as the iPad's hardware has evolved over the years. Knowing the right button combo for your specific device means you can grab what you need in a snap without fumbling around.
If you're using an older iPad with that classic round Home button on the front, the process is simple: press the Top (power) button and the Home button simultaneously. You'll see a quick white flash on the screen, and if your sound is on, you'll hear a camera shutter sound. A little thumbnail preview of your screenshot will immediately pop up in the bottom-left corner.
This little visual guide breaks it down perfectly.
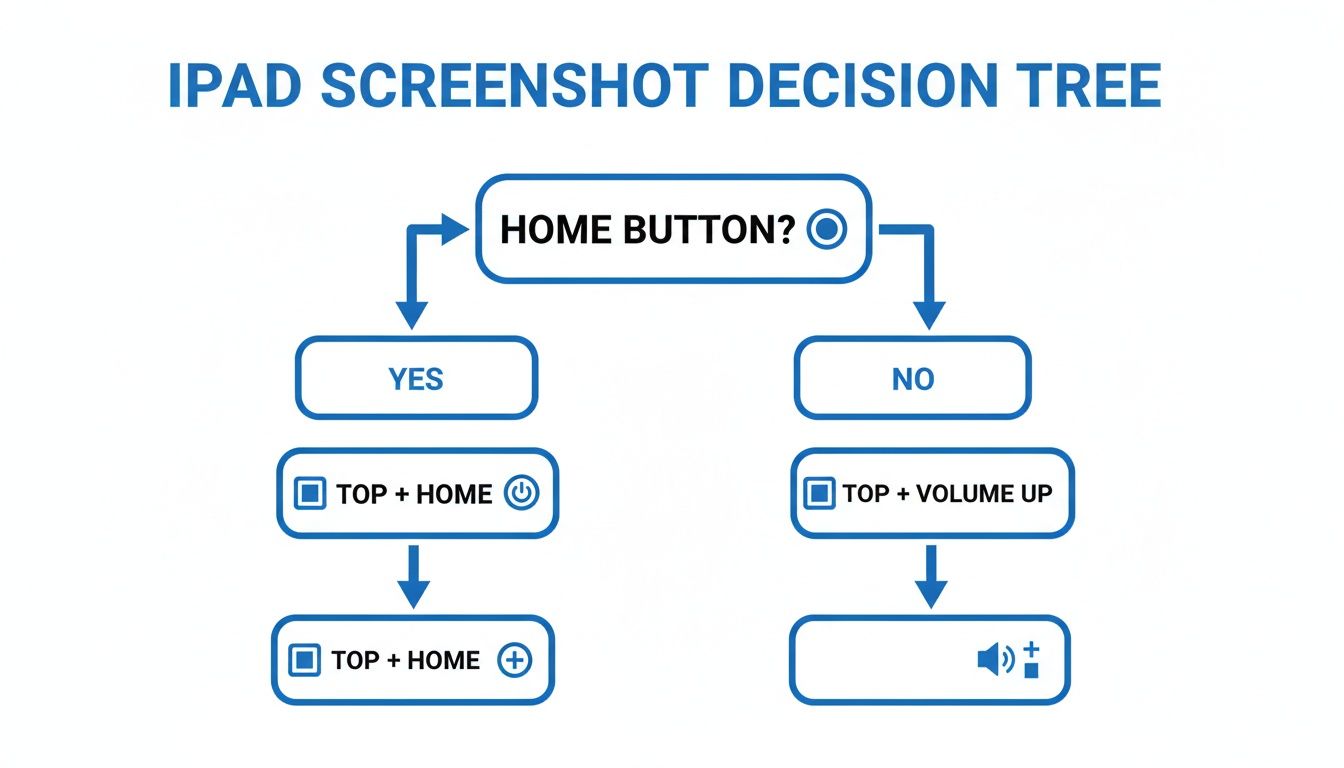
As you can see, that Home button is the only thing you need to look for to know exactly what to press.
The Modern, All-Screen iPad Method
For the newer, all-screen models like the iPad Pro, iPad Air, and the latest iPad mini, there's no Home button in sight. On these devices, the magic combination is a simultaneous press of the Top button and the Volume Up button.
Just like with the older models, the result is the same. The screen flashes, you hear the shutter sound, and that handy thumbnail preview appears, ready for you to take action.
iPad Screenshot Button Combos at a Glance
This quick reference table should help you find the right buttons for your specific iPad model in seconds.
| iPad Model Type | Required Button Combination | Where to Look |
|---|---|---|
| iPad Pro (Face ID) | Top Button + Volume Up Button | Buttons are on opposite sides of the device |
| iPad Air (5th gen and later) | Top Button + Volume Up Button | Buttons are on adjacent corners |
| iPad mini (6th gen and later) | Top Button + Volume Up Button | Buttons are on the top edge and side |
| Standard iPad | Top Button + Home Button | Look for the physical round Home button |
| Older iPad Air, iPad mini, or iPad Pro models | Top Button + Home Button | If it has a Home button, this is the combo |
Just find your model type, and you've got the exact button combo you need. It's a lifesaver when you're switching between different generations of iPads.
Tapping that little thumbnail preview the moment it appears is a crucial first step, especially for developers. It instantly opens the Markup editor, letting you annotate bug reports or prep images for the App Store. Acting fast saves a ton of time and keeps your workflow moving.
Beyond the Basics: Advanced Screenshot Tricks
Once you've got the button combos down, it's time to unlock the real power and speed of iPad screenshots. These next-level techniques are game-changers for designers, developers, or really anyone who needs more than a simple screen grab. They solve specific, often frustrating, problems and just make the whole process feel smoother.
Apple Pencil: The Instant Capture
For anyone living in an app like Procreate or taking notes, the Apple Pencil method is pure magic. Forget buttons. Just swipe up from either the bottom-left or bottom-right corner of the screen.
Bam. Instant screenshot. It immediately opens the Markup view, so you can start scribbling notes or highlighting something without ever breaking your creative flow. It’s one of those "how did I live without this?" features.
Capturing More Than What You See
Sometimes, what's on the screen just isn't the full picture. If you're a developer trying to document a long user flow or a marketer showing off an entire feature list, the scrolling screenshot is your best friend. This lets you capture the entire length of a webpage in Safari, a long document in Notes, or any other compatible app.
After you snap a screenshot, tap the little thumbnail preview that pops up. Look at the top of the editor, and you’ll see two options: Screen and Full Page.
- Screen: This is the default. It grabs only what you can see.
- Full Page: This is the one you want. Tap it, and you'll capture everything, even the parts you’d have to scroll to see.
You can then scroll through the entire captured page on the right side and save it as a clean PDF right to your Files app. No more stitching together multiple images. It's an unbelievably clean way to share long articles or create comprehensive documentation.
For app developers, this is huge. You can capture an entire onboarding sequence or a deep settings menu in a single, professional-looking document. It’s perfect for team reviews or for creating those detailed App Store assets that show the true depth of your app.
Making Screenshots More Accessible with AssistiveTouch
Fumbling with button combinations can be a pain, especially if your iPad is in a dock or a tight-fitting case. For anyone who finds the buttons tricky, AssistiveTouch is a fantastic alternative. It lets you create a custom on-screen button that does one thing: take a screenshot.
To get this set up, head over to Settings > Accessibility > Touch > AssistiveTouch.
Flip the switch on, then look under the "Custom Actions" section. You can assign "Screenshot" to a single tap, double tap, or long press of the floating on-screen button. This gives you a persistent, one-tap way to capture your screen no matter what you're doing.
Recent iPadOS updates have kept pushing these features forward, too. We now have HDR screenshots in HEIF format, which is critical for media-heavy apps that need to preserve all that rich dynamic range. This is especially important since around 40% of top App Store apps now feature HDR content.
On top of that, Visual Intelligence is now integrated. This means you can do things like query a screenshot with ChatGPT or do a visual search on Google or Pinterest right from the thumbnail. It’s a massive workflow accelerator. You can learn more about these powerful screenshot improvements and what they mean for both users and developers.
Turning a Good Screenshot Into a Great One: Markup and Editing
Taking a screenshot is just the start. The real magic happens when you turn that raw image into something that communicates clearly and effectively. Thankfully, iPadOS comes packed with a surprisingly powerful set of tools to do just that, no extra apps needed.
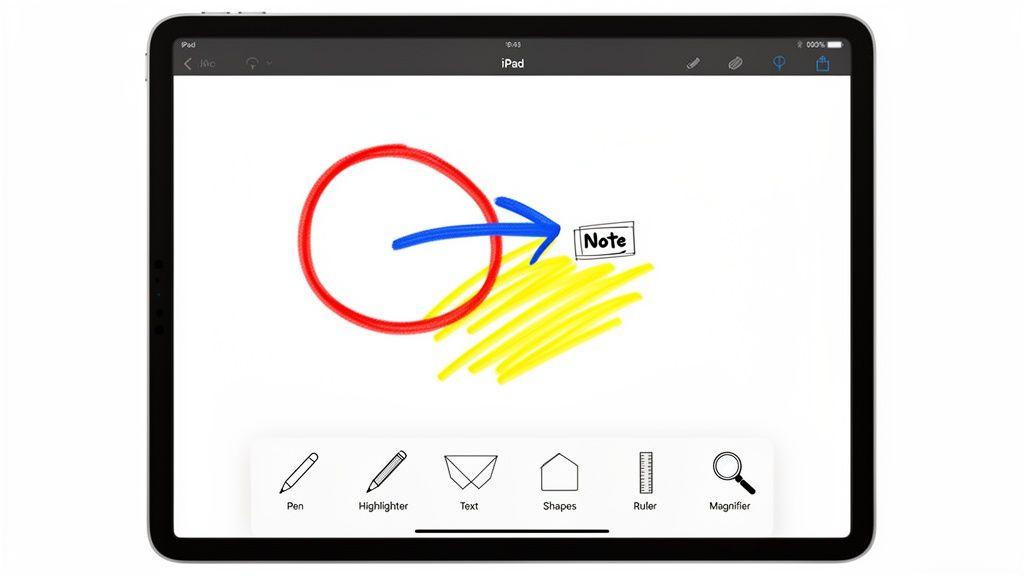
When you snap your screen, a little thumbnail pops up in the corner. Don't just swipe it away! Tapping it opens the Instant Markup interface, which is your command center for all things annotation. Ignoring this is a missed opportunity to add serious value to your images.
Your Essential Markup Toolkit
At the bottom of the screen, you'll find a simple-looking toolbar. This is where the action is. Each tool has a specific job, and knowing how to use them can turn your basic screenshot into a professional-looking asset.
Here’s a quick rundown of your go-to tools:
- Pens and Highlighters: These are your bread and butter for drawing attention. Use a pen to circle a bug on a UI element or grab the highlighter to emphasize a key number in a report. Tapping the tool again lets you tweak the color and opacity.
- Eraser: Made a mistake? No problem. The eraser tool has you covered. It offers both a pixel eraser for fine-tuning and an object eraser to nuke an entire shape or line with a single tap.
- Ruler: This is a designer's secret weapon. It lets you draw perfectly straight lines, which is invaluable for mocking up UI changes or pointing out precise alignment issues in an app design.
These basics are the foundation of clear visual communication. A developer can quickly circle a UI glitch, scribble a quick note with the pen, and fire it off to their team in seconds, all natively from their iPad.
Adding Context with Shapes and Text
Freehand drawing is great for quick notes, but sometimes you need more polish and clarity. That’s where the other half of the Markup toolbar shines, helping you create visuals that are clean and easy to understand.
Just tap the plus icon in the toolbar, and a menu of powerful options opens up.
A well-annotated screenshot can cut down back-and-forth communication by over 50%. By adding clear text, shapes, and magnifications, you provide all the context needed in a single image, saving everyone a ton of time.
For instance, you can drop in a Text Box to type out clean instructions, way more legible than my chicken-scratch handwriting. The Shapes tool lets you add perfect circles, squares, or arrows to pinpoint specific elements without the wobbly lines of freehand drawing. Need to hide sensitive info like an email or password? Just draw a solid rectangle over it.
One of the most useful features, though, is the Magnifier. This tool creates a circular magnifying glass effect, letting you zoom in on a tiny detail like a typo in a small font or a specific icon. It’s absolutely perfect for bug reports where every pixel counts.
And for those moments when you need to create high-converting app store assets with polished templates and more design options, a dedicated screenshot editor can take your visuals to the next level.
Turning Your iPad Screenshots Into High-Converting App Store Assets
For developers and marketers, a simple screenshot on an ipad isn't just an image; it's your most powerful sales tool. A raw screen capture rarely does an app justice. It just sits there, leaving potential users to guess what your app actually does for them. The real trick is to turn those basic captures into a compelling visual story that drives downloads on both the iOS and Android stores.
This is about more than just showing off features. You need to build a visual narrative that screams "this will make your life easier/better/more fun!" It’s about creating a sequence of images that walks someone through the value your app delivers.
Crafting a Compelling Visual Narrative
Think of your app store screenshots as a tiny, silent sales pitch. The first one must grab attention, the middle ones must show value, and the last one should push them to hit that "Get" button. This is your app's mini-storyboard.
First, identify the number one problem your app solves. Your first screenshot should be laser-focused on showing that solution in action. Then, use big, bold, benefit-driven captions. Instead of a dry label like "Task List View," use something that resonates, like "Organize Your Entire Day in Seconds." See the difference?
Here’s a great example of what this looks like when it all comes together.
Notice how the device mockups and vibrant, colorful backgrounds make everything look polished and professional? This builds trust far more effectively than a plain, floating image.
Speaking of mockups, always place your captures inside a device frame. A raw screenshot hanging in space looks amateur. Putting it inside a digital iPad frame gives it context and makes the whole presentation feel more tangible. This is the same thinking that goes into learning how to improve website conversion rates. It's all about clear visuals and a strong call to action.
Meeting Technical Specs and Streamlining Your Workflow
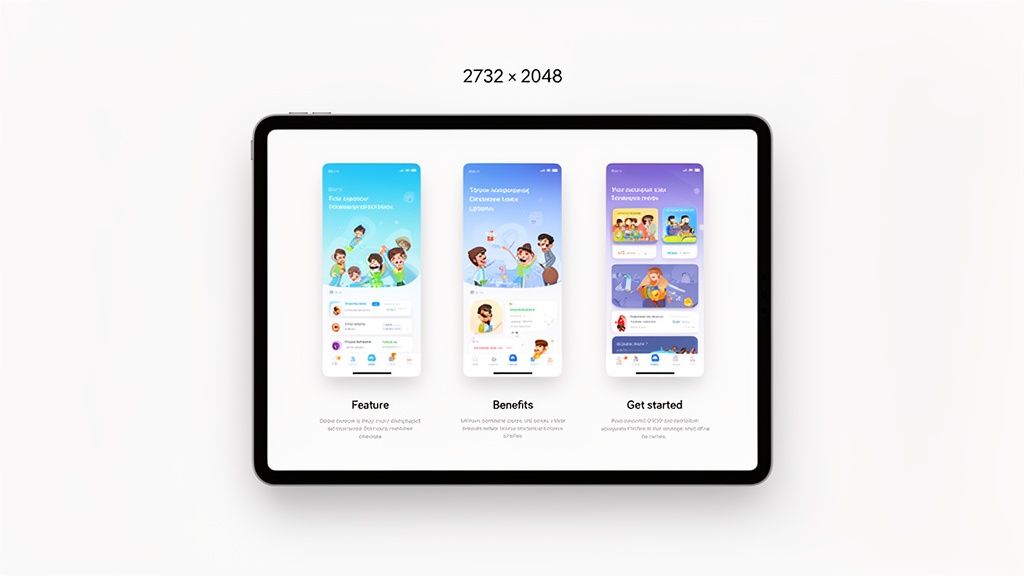
Beyond creativity, you must get the technical details right. Apple is notoriously picky. For the 12.9-inch iPad Pro, they demand screenshots that are exactly 2732 x 2048 pixels. Get it wrong, and your submission gets rejected. No exceptions.
Ever since the iPad first launched in 2010, screenshots have been a non-negotiable part of the submission process. If your app supports iPad, App Store Connect requires at least one iPad-specific screenshot. With over 500 million active iPads out there, you can't afford to ignore this.
In a market like the US, where iPad penetration for productivity apps is over 25%, App Store Optimization (ASO) experts have seen that skimping on proper iPad screenshots can slash conversions by as much as 30%. That’s a huge hit to your app store growth.
The thing is, creating all these assets manually for every single device and every app update is a soul-crushing amount of work. This is where specialized tools become an absolute lifesaver.
Platforms like ScreenshotWhale were built to solve exactly this problem. You can use professionally designed templates and a simple drag-and-drop editor, saving you countless hours. For a practical example, load a raw screenshot into the site editor, choose a template with a device mockup and a bold caption area, and instantly see how much more professional it looks.
These tools make sure your final assets aren't just beautiful but are also perfectly formatted for both the App Store and Google Play, turning a complicated process into a smooth workflow from capture to conversion.
Getting Your Screenshots Ready for the World Stage
If you're only targeting users in your home country, you're leaving a massive opportunity on the table. But simply throwing your English-language App Store visuals at a global audience just won't cut it. To really connect with people in different markets, your iPad screenshots need to speak their language, both literally and culturally.
This whole process is called localization, and it's a non-negotiable part of serious App Store Optimization (ASO). Get it right, and you'll see a real impact on your international growth.
The problem? The thought of manually creating and managing dozens of screenshot sets for every language you support is enough to make anyone's head spin. It's painfully slow, gets expensive fast, and is a surefire way to introduce errors and brand inconsistencies. This is exactly where modern tools change the game.
Let Automation Handle the Translations
Picture this: you've just pushed a big app update and now you have to regenerate screenshots for 20 different languages. The manual grind would be enormous. Instead of getting bogged down in that, platforms like ScreenshotWhale can do the heavy lifting with AI, instantly translating your screenshot copy while keeping your design perfectly intact.
This lets you scale your efforts without wanting to pull your hair out, all while making sure your brand looks sharp and consistent in every single market.
Don't just take my word for it. A study from CSA Research found that a whopping 76% of online shoppers prefer buying products that have information in their own language. That preference absolutely extends to the app stores, where localized screenshots build trust and can seriously boost your conversion rates.
By automating the text part of the equation, you free yourself up to focus on the trickier, more nuanced side of localization: making sure your visuals actually resonate with different cultures.
It's More Than Just Words: Cultural Adaptation
Great localization goes way beyond a simple word-for-word translation. Cultural nuances have a huge impact on how users see your app. A visual that works perfectly in North America might fall completely flat, or worse, be offensive, in Japan or Brazil. Things like colors, symbols, and even the people you show in your screenshots can carry entirely different meanings around the world.
Here are a few practical things to keep on your radar:
- Visuals and Imagery: Double-check that your icons and images are culturally appropriate. Be careful to avoid symbols that could be misinterpreted or have negative connotations in certain regions.
- Font Selection: When you're localizing for languages with different scripts, like Japanese or Arabic, you can't just stick with your default font. You need to pick one that's clear, legible, and looks good for that specific script.
- A/B Test Everything: Don't just assume you know what will work. The only way to know for sure is to A/B test your localized screenshot sets in your key international markets. Pit different captions, color schemes, and images against each other to find the winning formula for each region.
Successfully adapting your iPad screenshots for a global audience is a complex puzzle, but the payoff is well worth the effort. If you want to go even deeper on the strategy, you can learn more about the differences between localizing and localising your app store assets. By investing in a smart localization workflow, you’ll build a much stronger connection with users everywhere and unlock some serious growth for your app.
Got Questions About iPad Screenshots?
Once you've got the basics down, a few tricky situations can still pop up. Let's walk through some of the most common questions I hear, with quick answers to get you sorted.
Where Do My iPad Screenshots Go?
By default, your iPad saves every screenshot you take right into the Photos app. The quickest way to find them is in the "Recents" album.
iPadOS is also smart enough to create a dedicated "Screenshots" album, which is super handy for keeping all your screen captures in one tidy spot.
Now, if you use the "Full Page" option to grab a long article or document, things work a little differently. Instead of saving to Photos, your iPad will ask you to save it as a PDF directly to the Files app. This is a great way to keep those lengthy captures separate from your photo library.
Can I Take a Screenshot While Recording My Screen?
Yep, you absolutely can. If you're in the middle of a screen recording, just use the same button combo for your iPad model to snap a picture.
The screenshot will capture everything on your screen at that moment, including the little red recording indicator, and save it to Photos like normal. Don't worry, it won't interrupt your recording at all.
How Can I Change the Screenshot File Format?
Out of the box, iPadOS saves screenshots as high-quality PNG files to make sure every detail is crisp. There isn't a built-in setting to change this.
If you need a different format, like a JPEG, you'll have to convert it. The easiest way is to open the screenshot in Photos, hit the Share button and "Copy Photo," then paste it into the Files app or another editor. From there, you can export it in whatever format you need.
By the way, if you're thinking about your files on an older device, it's always a good idea to know what to do with old iPads to keep your data safe and sound.
Ever taken a screenshot of a movie and just gotten a black screen? That's usually because of Digital Rights Management (DRM). Streaming apps like Netflix and Amazon Prime Video block screen captures to prevent piracy. It's an intentional feature, not a bug!
Ready to transform your captures into high-converting store assets? With ScreenshotWhale, you can create professional, on-brand App Store and Google Play screenshots in minutes using our powerful editor and templates. Start designing for free!
Generate your store screenshots in minutes
Upload raw app screenshots and let AI produce polished, localized App Store and Google Play sets.
Try the generator free