Auto Align Layers in Photoshop for Perfect App Screenshots
Master how to auto align layers in Photoshop. This guide offers actionable tips for creating pixel-perfect, high-converting app store screenshots.
When your app store screenshots look even a little bit off, people notice. Misaligned UI elements and inconsistent spacing can make an app feel cheap or untrustworthy, actively hurting your conversions. Learning how to properly auto align layers in Photoshop is a simple, high-impact skill that builds trust and helps drive more downloads on both the iOS App Store and Google Play Store.
Why Precise Alignment Is Your Secret Conversion Weapon
Perfectly aligned screenshots are non-negotiable for success on the App Store and Google Play. It is not just about looking good; it is about creating a sense of professionalism and quality that directly influences a user's decision to download.
When your text, device mockups, and UI elements are all flawlessly lined up, it sends a powerful signal: this is a polished, trustworthy app. It is a small detail that makes a huge strategic difference, helping your app become the obvious choice in a sea of competitors and boosting your app store growth.

Boost App Store Growth and Conversions
Getting alignment right has a direct impact on your bottom line. Data shows that apps with professionally designed and aligned screenshots can see a significant uplift in install rates in competitive categories. It's a key part of creating efficient and high-converting app store screenshots.
For developers and marketers, mastering these tools is essential. Your screenshots are often the first, and sometimes only, impression a user gets of your app. Clean alignment shows attention to detail, which users will assume extends to the app itself.
If you want to zoom out and see how alignment fits into the bigger picture of user experience and conversion rates, it's worth exploring the leading resources on modern AI UI UX tools for mobile app development.
This is not just about results; it is about efficiency. Nailing your workflow saves a ton of time, allowing you and your team to produce polished assets much faster. For example, using Photoshop's alignment tools can cut down the time it takes to create a full set of screenshots from hours to minutes.
When you are trying to piece together multiple images into one big, seamless design, Photoshop’s Auto-Align Layers command is an absolute game-changer. This is not just about basic alignment; it intelligently scans the content of your layers and stitches them together perfectly.
This is a must-know technique if you are creating panoramic app store screenshots that walk a user through a multi-step flow.
Let's say you have three separate screenshots from your app's onboarding sequence. Trying to line them up by hand inside device frames is a recipe for frustration. You will spend ages nudging pixels, and it will probably still look a bit off. With Auto-Align, you let Photoshop do all the heavy lifting for you.
How to Use Auto-Align in Your Workflow
Getting this to work is incredibly straightforward. Just pop open your Layers panel and select all the layers you want to merge.
From there, head up to the menu and click Edit > Auto-Align Layers. A dialog box will appear with a few different projection modes to choose from.
- Auto: This is Photoshop's best guess, and honestly, it works like a charm for most situations. It is the go-to for standard app screenshots.
- Perspective: Pick this one if your source images were shot from slightly different angles. It will correct the distortion and create a unified, flat view.
- Collage: This mode is a bit different. It resizes and rotates layers to fit them together, but it will not warp or change their actual shape.
For nearly any app store asset you are building, the 'Auto' setting is all you will ever need. It is specifically designed to find overlapping content and blend the layers without messing up the UI elements. This method is a lifesaver, whether you are working with raw screenshots or dropping them into a polished mockup iPhone PSD.
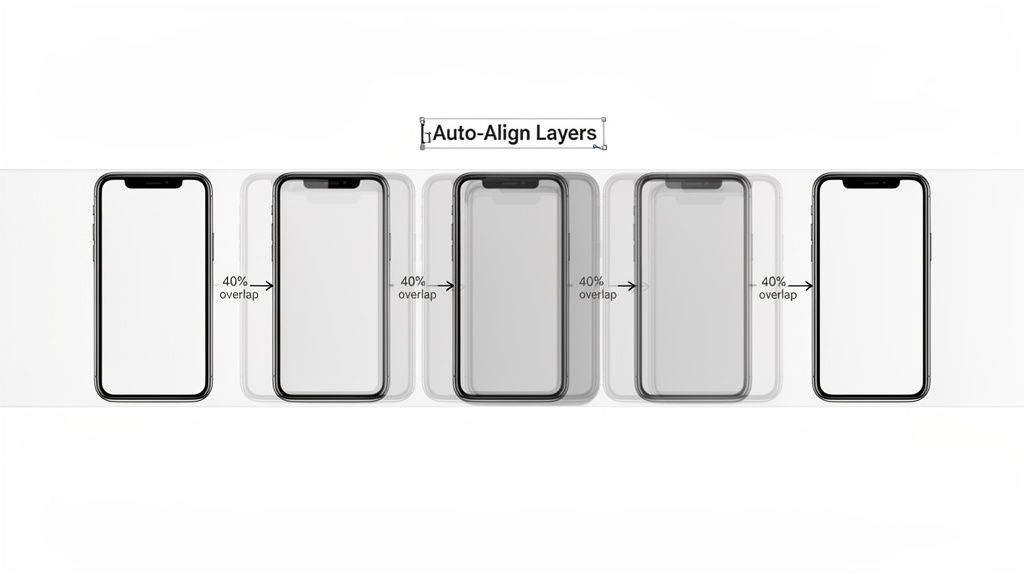
Pro Tip: For Auto-Align to really work its magic, Photoshop needs enough common ground between your images to analyze. A good rule of thumb is to have at least 40% overlap between your layers. If you do not have that, Photoshop might get confused and fail to find matching points, leaving you with gaps or bad alignment.
Once you get the hang of the Auto-Align Layers command, you will find yourself creating complex, high-impact visuals in a fraction of the time. It frees you up from tedious pixel-pushing so you can focus on the creative side of things: building a professional, cohesive story that grabs attention and boosts downloads.
Everyday Alignment with the Move Tool
The full-blown Auto-Align Layers command is a powerhouse for blending complex photos, but it is often overkill for day-to-day design work. When you just need to get your app store screenshots looking clean and sharp, the alignment options built right into the Move Tool are your best friend.
Seriously, this is where you will live most of the time.
Just grab the Move Tool (shortcut: V), select a few layers, and a new set of icons will pop up in the top options bar. These six little buttons are your ticket to instant organization.
Imagine you have a device mockup, a title, and a short description all floating around. Instead of nudging them with the arrow keys, just select all three layers and click Align Horizontal Centers. Boom. A perfectly balanced vertical stack, done in a single click.
Quick Control with Alignment and Distribution
This is all about getting precise, immediate control over your layout. That speed is critical when you’re trying to build high-converting visuals. A clean, organized presentation makes your app feel professional and trustworthy; messy screenshots do the opposite.
The six main alignment options you’ll use constantly are:
- Align Top Edges
- Align Vertical Centers
- Align Bottom Edges
- Align Left Edges
- Align Horizontal Centers
- Align Right Edges
But do not overlook the Distribute options right next to them. These are absolute gold for creating even spacing between elements. Got a row of feature callouts or a few device mockups that need to be perfectly spaced apart? Distribute is how you do it, ensuring your design feels balanced and easy for the eye to follow.
This is not just a "nice-to-have" feature; it fundamentally changes how fast you can work. For example, when creating a row of five app screenshots for an iOS App Store listing, selecting all five device mockups and clicking "Distribute Horizontal Centers" ensures perfect, even spacing in seconds, a task that could take minutes of manual adjustment. You can find more official tips on Photoshop's layer management help page.
Mastering the Move Tool’s alignment and distribution functions is the most straightforward way to auto align layers in Photoshop without digging through menus. It’s a workflow that directly helps you produce polished, professional-looking app store screenshots that grab attention and drive downloads.
Beyond the automated commands, Photoshop has some fantastic "invisible helpers" that make manual adjustments feel just as precise. For creating perfectly balanced layouts, Smart Guides and the Snapping feature are total game-changers. They give you instant visual feedback as you drag elements around, which is incredibly useful for app store screenshots.
To switch them on, just head up to View > Show > Smart Guides. You will know it is working when you start dragging a layer and see bright magenta lines pop up. These lines instantly show you when an element is centered or aligned with the edges of other layers, completely removing the guesswork from positioning.
Build Muscle Memory for Perfect Layouts
Think about dragging a “Download Now” button into your design. With Smart Guides active, it will almost magically snap into place, perfectly centered below your main text or aligned with the edge of a device frame.
This constant, real-time feedback is how you start to build muscle memory for clean, professional design. You just start to feel where things should go, which is a huge part of understanding professional layout design.
Mastering Smart Guides is the secret to making sure every single screenshot you create looks polished and sticks to your brand guidelines. It’s the closest you can get to having Photoshop align layers in real-time as you move them by hand.
This flowchart can help you decide which alignment tool is right for the job at hand.
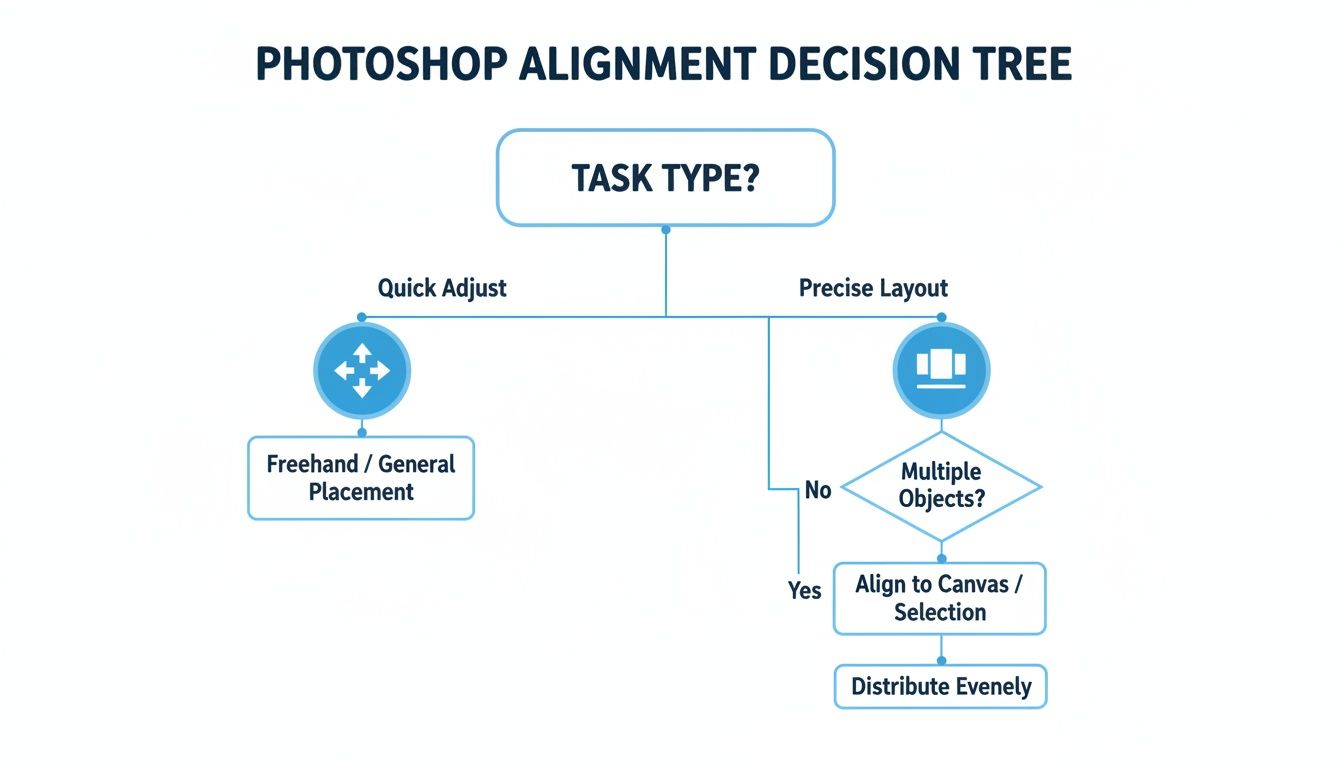
As the chart shows, for quick and simple tweaks, the Move Tool icons are your best bet. But when you are dealing with a more precise, multi-element layout, the Distribute options are what you will want to reach for.
Which Photoshop Alignment Method Should You Use?
Feeling a bit overwhelmed by the options? Do not be. Here’s a quick rundown to help you pick the right tool for the right situation, whether you are tidying up a simple UI mockup or wrangling a complex composition for your app screenshots.
| Method | Best For | Speed | Use Case Example |
|---|---|---|---|
| Move Tool Icons | Quick, simple alignment of a few layers | Very Fast | Centering a title, subtitle, and device mockup vertically. |
| Distribute Spacing | Creating even, consistent gaps between multiple objects | Fast | Spacing out three feature icons evenly below a screenshot. |
| Auto-Align Layers | Merging photos or aligning content-rich layers | Slow | Creating a seamless panoramic screenshot from multiple captures. |
| Smart Guides | Precise manual adjustments and real-time feedback | Instant | Nudging a text block to align perfectly with an image. |
Each method has its place. The more you use them, the more you will instinctively know which one to grab to get the job done efficiently.
Even a tool as familiar as Photoshop can leave you scratching your head sometimes. If you’ve ever gone to auto-align layers in Photoshop only to find the options are completely grayed out, you’re in good company. It’s one of the most common hiccups, but thankfully, the fix is almost always a simple one.
Nine times out of ten, this happens for two reasons: you have only got one layer selected, or your main image is still a locked Background layer. Photoshop needs at least two regular, unlocked layers to know what you want to align.
Getting Your Alignment Options Back
The solution is a quick fix. If you just have a single layer selected, hold down Shift or Ctrl/Cmd and click another layer in your Layers panel. You should see the alignment icons in the Move Tool's options bar light up immediately.
If a locked Background layer is the culprit, just double-click it in the Layers panel. A dialog box will pop up asking you to rename it; you can just hit "OK." This instantly converts it into a normal, editable layer. Now you can select it along with your other layers and get everything lined up.
Another classic problem is when the Auto-Align Layers command gives you a warped, distorted, or just plain bizarre result. This usually means Photoshop could not find enough overlapping content to work with, or the perspectives in the images were just too different to reconcile.
To fix this, make sure your images share some significant, common details. I have found that just manually moving the layers a bit closer to their final position, creating more obvious overlap before running the command, is often all it takes.
Getting these little troubleshooting steps down will save you a ton of frustration and keep your app store screenshot production moving, helping you hit those launch deadlines without the headache.
Got Questions About Aligning Layers in Photoshop?
Even with Photoshop’s powerful tools, you’re bound to hit a snag now and then. It happens to everyone. Here are the straight-up answers to the most common issues designers and app marketers run into when trying to get their layers perfectly aligned.
Why Are My Alignment Options Grayed Out?
This is easily the most frequent roadblock, but the fix is almost always simple. The alignment icons go gray when you have not given Photoshop enough information to work with. Usually, it is one of two things:
- You've only selected one layer. Photoshop needs at least two layers to know what you want to align. It cannot align a single layer to itself.
- You've selected the locked Background layer. By default, the main Background layer is pinned in place and cannot be moved or aligned.
To get things working again, just hold Ctrl/Cmd and click on at least two unlocked layers in your Layers panel. If that main image is the problem, just double-click the Background layer, give it a name, and hit "OK." That converts it into a regular, movable layer. Problem solved.
What’s the Difference Between Align and Distribute?
Getting a handle on these two is a game-changer for building clean app store screenshots quickly. You will find both in the Move Tool's options bar, but they do very different jobs.
- Align: This function is all about lining things up. It moves multiple layers so their edges or centers match. For example, hitting Align Left Edges shoves all selected layers over so their leftmost pixels form a single, clean vertical line.
- Distribute: This is about creating consistent spacing between three or more layers. Using Distribute Horizontal Centers makes sure the gap from the center of one object to the center of the next is exactly the same for all of them.
Here is the easiest way to think about it: Align stacks things up, while Distribute spreads them out evenly.
A common rookie mistake is trying to use Distribute on only two layers; it won’t work. The command needs at least three objects to calculate the spacing between them. Nailing both Align and Distribute is essential for creating the kind of clean, organized layouts that look professional and boost conversions on the App Store and Google Play.
Can I Auto-Align Layers That Don't Overlap?
In short, no. The Auto-Align Layers command (the one buried under Edit > Auto-Align Layers) is a specialized tool designed to analyze overlapping content and stitch images together. Think panoramas or complex photo composites.
If your layers do not share any common pixels, Photoshop has zero data to work with, and the command will either fail or give you some truly bizarre results.
That tool is not meant for arranging separate UI elements. When you need to align distinct objects like buttons, text boxes, and device mockups, you will want to stick with the Move Tool's alignment options and Smart Guides. They give you the pixel-perfect control needed to craft those flawless app store screenshots without requiring any overlap.
Ready to create stunning, high-converting App Store and Google Play screenshots in minutes? ScreenshotWhale combines professional templates with a simple drag-and-drop editor to make your app look its best. Start designing for free!
Generate your store screenshots in minutes
Upload raw app screenshots and let AI produce polished, localized App Store and Google Play sets.
Try the generator free