
How to Create High-Converting App Store Screenshots for iOS & Android
A practical guide to capture high resolution screenshots for the iOS and Android stores. Learn proven techniques to create images that boost app conversions.
To create app store screenshots that actually drive downloads, you must treat them as your most valuable marketing asset. This is not just about snapping a picture of your app's screen. It is about crafting a visual pitch where every pixel is sharp, clear, and screams quality, moving beyond basic device captures to build instant user trust and boost conversions.
Think of your screenshots as the storefront window to your app. Their quality has a direct, and often immediate, impact on your app store growth.
Why High-Resolution Screenshots Drive App Store Success
First impressions on the App Store and Google Play are everything. Potential users make snap judgments in seconds, and blurry, low quality images are an immediate red flag. It signals a lack of polish and attention to detail, leading users to assume the app itself is just as flawed.
When you capture high resolution screenshots, you are doing more than just showing an interface; you are communicating professionalism and building credibility. Crisp, vibrant visuals make your app look far more appealing and trustworthy, which is a core piece of a strong App Store Optimization (ASO) strategy. You can learn more about how powerful ASO is by reading our guide on what ASO stands for and how it works.
The Real Impact of Image Quality on Conversions
Picture two competing apps in the search results. One has pixelated, poorly cropped images. The other showcases pristine, high resolution visuals that highlight its best features with clear, readable text. A user scrolling through the store will almost always gravitate toward the latter, associating that visual quality with the app's overall performance.
This perception is not just a feeling; it has a direct and measurable effect on downloads. High quality screenshots can dramatically improve your conversion rates because they:
- Build Instant Trust: Professional visuals tell users you care about your product.
- Clearly Showcase Value: Sharp images let you demonstrate your app's core benefits without any ambiguity.
- Stand Out in a Crowded Market: Superior visuals are a massive differentiator in packed search results and category listings.
The demand for better visual assets is exploding. The global screen capture software market was valued at $9.58 billion in 2024 and is projected to hit $10.84 billion by 2025, driven by this exact need for better marketing materials.
Your Screenshots as a Conversion Tool
Ultimately, your app store screenshots are a powerful sales tool. Each image is a fresh opportunity to persuade a user to tap "Install." By investing the effort to capture truly high resolution screenshots, you ensure your visual pitch is as compelling as it can possibly be.
Your app store page is a digital billboard. Low resolution screenshots are like a faded, peeling poster, while high resolution ones are like a bright, dynamic LED screen that grabs attention and pulls people in.
For a deeper dive into growing your audience, it's worth exploring these strategies to increase app visibility and downloads. The principles of driving traffic and engagement are universal, and it all starts with presenting a polished, professional image that captivates and converts.
Using Native Tools for Pixel-Perfect Screenshot Captures
To get those razor sharp screenshots that meet the app stores' strict requirements, your best bet is to go straight to the source: the native development tools from Apple and Google. Forget trying to perfectly time a button press on a physical phone. These tools are built to produce pixel perfect images directly from the simulator, cutting out all the guesswork and quality loss.
Honestly, they are the industry standard for a reason.
Using an emulator or simulator instead of a physical device gives you total control. This is how you guarantee you get the exact resolution and file format the app stores demand. It is fundamental for a professional looking store listing that boosts app store growth.
Mastering iOS Screenshots with Xcode Simulator
For anyone building for iOS, the Xcode Simulator is your go-to. It lets you run your app on a virtual version of any iPhone or iPad, so your captures are always flawless. The whole process is surprisingly straightforward and ensures you get the highest quality output every time.
First, get your app running in the Xcode Simulator. The key here is to select the correct device model, like the iPhone 15 Pro Max, to match the dimensions the App Store requires. Once your app is showing the screen you want to capture, resist the muscle memory to hit the standard macOS screenshot shortcut.
Instead, use the Simulator's own capture function.
- Navigate to File > Save Screen in the Simulator's menu bar.
- Or, just use the much faster keyboard shortcut: Cmd + S.
This one move saves a perfect, uncompressed PNG file right to your desktop. It will have the exact native resolution of whatever device you are simulating, with zero scaling artifacts. This is, without a doubt, the cleanest way to capture high resolution screenshots for your App Store submission.
A common pitfall I see is developers resizing the simulator window on their Mac for convenience. Always, always make sure the simulator is set to its native resolution by going to Window > Physical Size (or hitting Cmd + 1). This stops macOS from scaling the image, which can subtly degrade the quality.
If you're new to the Apple ecosystem, our guide on how to take a screenshot with an iPhone covers some of the foundational basics.
You can see from Apple's own guidelines just how much they emphasize clean, UI focused visuals, the kind best achieved through simulators.
This example from Apple’s documentation shows exactly what they want: screenshots that focus purely on the app experience, free from distracting device frames or backgrounds.
Nailing Android Screenshots with the Android Studio Emulator
The process for Android is pretty much the same, just using the emulator inside Android Studio. Like its Xcode counterpart, the Android Emulator is the definitive tool for creating submission ready screenshots for the Google Play Store. It offers a level of precision a physical device just cannot match.
Once you have your app running on a virtual device, look for the emulator's extended controls panel. It is usually a floating toolbar next to the device window. In that panel, you will find a little camera icon. That is your target.
Clicking that camera icon instantly captures the screen and pops open a new window to review and save the image. This method ensures you get a high quality PNG without any compression artifacts or unwanted system UI like the status bar or navigation buttons.
Why Native Tools Are Just Better
Relying on native simulators is not just about convenience; it is about precision. Both the Apple App Store and Google Play have very specific resolution requirements for different devices. Getting them wrong means your app update gets rejected. It is that simple.
To make this easier, here is a quick reference for some of the most common screenshot dimensions you will need.
Key Device Screenshot Dimensions for App Stores
| Device or Display Group | Required Dimensions (Portrait) | Platform |
|---|---|---|
| 6.7" iPhone (Pro Max) | 1290 x 2796 pixels | Apple App Store |
| 6.5" iPhone (Pro Max) | 1242 x 2688 pixels | Apple App Store |
| 5.5" iPhone (Plus) | 1242 x 2208 pixels | Apple App Store |
| 12.9" iPad Pro | 2048 x 2732 pixels | Apple App Store |
| Phones (General) | Between 320px and 3840px | Google Play Store |
| 7-inch Tablets | Between 320px and 3840px | Google Play Store |
| 10-inch Tablets | Between 320px and 3840px | Google Play Store |
Trying to resize or crop images manually to hit these exact numbers is a recipe for frustration and blurry assets.
The native developer tools are built to output these exact sizes from the get go. By just selecting the right virtual device, you are guaranteed a file that meets the technical specs. That frees you up to focus on what actually matters: the content of the screenshot itself. This workflow does not just save a ton of time. It makes your app store presence look far more professional, which directly builds user trust and boosts those all important conversion rates.
Transforming Raw Captures into High-Converting Assets
A technically perfect, high resolution screenshot is just the starting line. It’s the raw material. The real magic happens when you turn that clean capture into a persuasive marketing asset that actually drives installs for the Android and iOS stores.
This is less about the technical capture and more about crafting a visual narrative that convinces someone scrolling through the app store to stop and hit "Install."
Your goal is to tell a story. Think of each screenshot as a mini billboard for your app. Each one should communicate one clear benefit or feature that makes your app seem absolutely essential. You are basically walking a user through your app's highlight reel before they have even downloaded it.
Building a Compelling Visual Story
The best app store listings always present a cohesive set of screenshots that flow logically from one to the next. You want to start with your app's main value proposition, the big promise, then guide the user through key features or use cases. It should feel like an intuitive journey that builds excitement with every swipe.
Imagine you have got your site editor open. You drop that pristine, raw capture onto the canvas. A good screenshot tool lets you instantly place it on a vibrant, on brand background with appealing imagery. That simple step makes the screenshot pop, grabbing attention against the app store's plain white or dark interface.
Next, you slide that capture into a clean, modern device frame, maybe an iPhone 15 Pro or a Google Pixel. This gives it context and makes the experience feel tangible. It is no longer just a random piece of UI; it is your app running on a device just like theirs.
Design Principles for High Conversion
To make each screenshot work harder, you need to lean on some core design principles. Every single element you add should have a purpose, guiding the user's eye and reinforcing your core message. It is about creating an undeniable call to action.
- Focus on One Key Benefit Per Image: Do not cram everything into one screen. It’s a classic mistake. Dedicate each visual to a single, powerful feature, like "Track Your Progress" or "Connect With Friends Instantly."
- Use Bold, Contrasting Colors: Your color palette needs to be eye catching and aligned with your brand. Use vibrant colors to draw attention to important UI elements or the caption text itself.
- Write Impactful, Readable Captions: The text above your screenshot is your headline. Use a large, clean font and keep the copy short and benefit driven. Do not tell them what your app does; tell them what they can achieve with it.
The best app store screenshots do not just show what an app looks like; they show what a user's life will look like with the app in it. Focus on outcomes, not just features.
This approach creates a clear visual hierarchy. The background grabs attention, the device frame provides context, the screenshot shows the feature, and the caption sells the benefit. Each piece works together to build a powerful, persuasive asset.
Polishing Your Assets for Maximum Impact
Once you have the core elements locked in, a few final touches can elevate your screenshots from good to great. Small details often make the biggest difference in how professional and polished an app feels.
A great technique is to use subtle background effects. Think gradients, abstract shapes, or even blurred imagery to add depth without being distracting. To really make your app's UI the hero, you can lean on techniques like blurring backgrounds in photos and videos like a pro. It is a simple trick that keeps the focus exactly where you want it: on your app's key features.
By combining a solid strategy with smart design choices, you transform a simple effort to capture high resolution screenshots into a powerful conversion engine. This framework gives you a repeatable process for producing a stunning and effective set of images for every app launch and update.
Automating Your Screenshot Workflow for Speed and Scale
Creating screenshots manually for every device, language, and update is a soul crushing time sink. As your app grows, the process does not just get tedious. It becomes unsustainable. It introduces mistakes, slows down your launch cycles, and holds back your growth.
This is where building a smart, scalable workflow is not just a nice to have; it is a necessity for boosting app store growth.
The big shift is moving away from one off designs in Figma or Photoshop and embracing a templated, automated approach. Modern screenshot platforms are built to solve this exact problem. They let you create one master design and instantly apply it across hundreds of raw captures.
The Power of a Templated System
Imagine you’ve designed the perfect screenshot layout in your site editor. You have got your branded device frames, your company's font for captions, and a vibrant background that makes your app’s UI pop.
Now, instead of manually rebuilding that design for an iPhone 15 Pro, then a Google Pixel, then an iPad, you just apply the template. Done.
This is a complete game changer for a few key reasons:
- Rock Solid Brand Consistency: Every screenshot, across every device and language, looks cohesive and professional. No more weird variations.
- Insane Speed: What used to take a designer hours, or even days, can now be done in minutes. This dramatically shortens the time it takes to get updates and new launches out the door.
- Scalable Localization: Translating and redesigning screenshots for different regions is one of the biggest bottlenecks in going global. A templated workflow automates this, making international launches realistic for any team.
This simple flow, capture, design, convert, transforms a manual chore into a high powered asset production line.
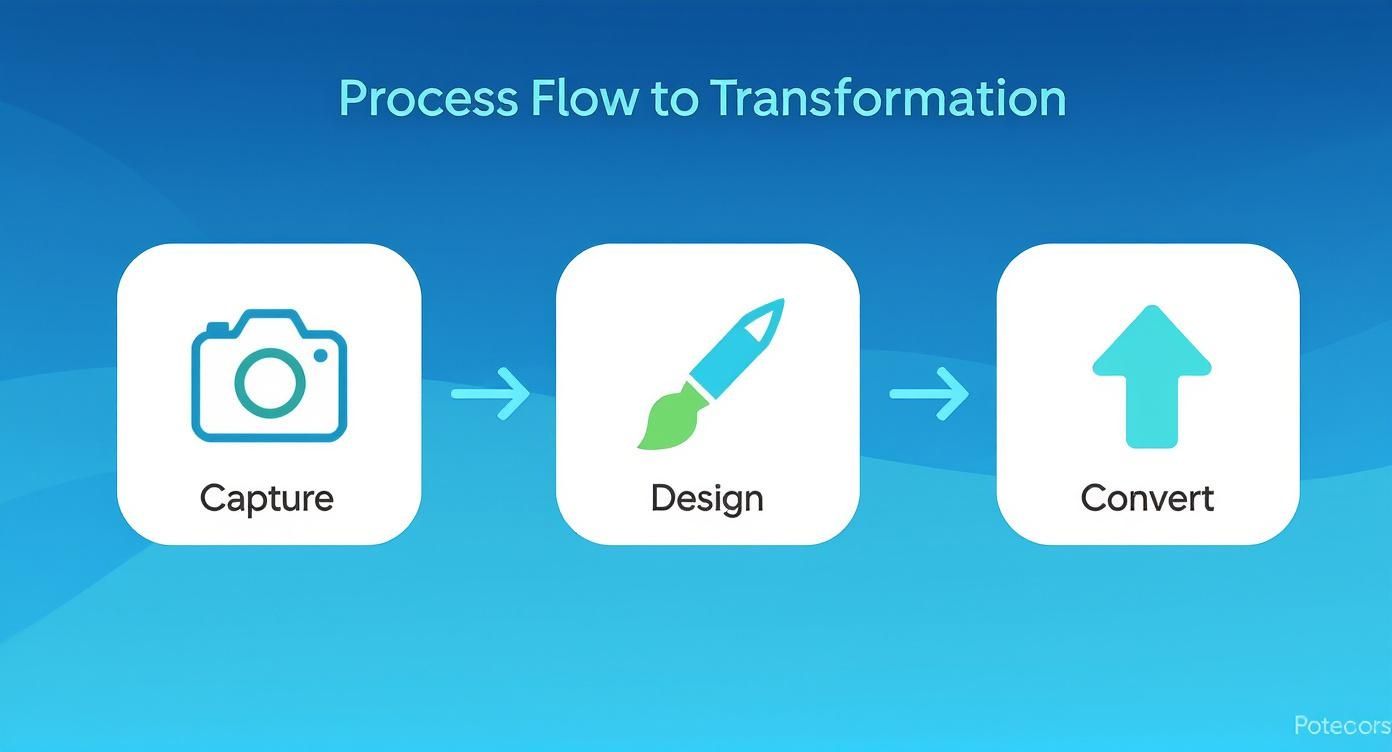
This process connects the technical task of grabbing a screen with the creative work of making a compelling visual, leading to a finished product that is ready to convert on the app stores.
API-Driven Workflows for Maximum Efficiency
For teams that need even more horsepower, an API driven workflow is the final frontier. Instead of manually uploading screenshots into a web editor, you can programmatically send your raw captures to a service like ScreenshotWhale.
The API then takes over, applying your chosen templates, localizing the text, and sending back a complete set of polished, store ready assets.
Think of it as a production line for your app store visuals. Raw materials (your high resolution captures) go in one end, and perfectly designed, localized, and formatted marketing assets come out the other, with almost no human intervention.
This level of automation is no longer a luxury. The market for full screen website screenshot software has ballooned precisely because of this demand for pixel perfect images at scale. As detailed in the latest research on screenshot software market growth, tools with automation and API hooks are becoming essential for staying competitive.
Real-World Scenario: Launching in Multiple Countries
Let us make this real. Your app is launching in five new countries, each with its own language. You also support three flagship devices on both iOS and Android.
Do the math. That is 30 unique sets of screenshots. Manually, that is a nightmare for any design team.
With an automated, API driven workflow, the process is ridiculously simple:
- Capture: You programmatically capture high resolution screenshots of your key app screens for just one device.
- Design: You have already built one master template in a tool like ScreenshotWhale that defines your frames, backgrounds, and text styles.
- Execute: You make a single API call, feeding it the raw screenshots and the translated text strings for each language.
Minutes later, the API delivers perfectly framed and translated screenshots for all 30 device language combinations. The manual work drops from days to nearly zero. You get perfect brand consistency and a much, much faster global launch.
This is how you achieve speed and scale without sacrificing quality, a critical advantage in today's app market.
Your Top Screenshot Questions, Answered
If you have ever felt like navigating app store requirements is a minefield of technical rules and unwritten design expectations, you are not alone. Developers and marketers hit the same walls all the time. Let’s clear up some of the most common questions about getting your screenshots right.
“Why Do My Screenshots Look Blurry After I Upload Them?”
This is easily the most frustrating and common problem. The culprit is almost always one of two things: you are starting with the wrong dimensions, or you are fighting a losing battle with file compression.
Every image you upload gets re-compressed by the app stores. If you feed them a low quality JPG or an already squashed PNG, their process just degrades it even further. It is a classic garbage in, garbage out situation.
To fix this, you have to start with a pixel perfect source.
- Go Native: Use the built in capture tools. For iOS, it is
Cmd + Sin the Xcode simulator. For Android, it is the little camera button in the Android Studio Emulator. This gives you a lossless PNG at the exact resolution you need. - Check Your Dimensions (Twice): Make sure your final designed asset matches the required store dimensions to the exact pixel. Seriously, even a one pixel difference can trigger a resizing algorithm that instantly softens your sharp UI.
“Why Do My Colors Look Washed Out on the App Store?”
You are not imagining it. If your app’s vibrant colors look dull and lifeless after you upload them, you have run into a color profile mismatch.
Modern iPhones capture screenshots in the Display P3 color space, which has a much wider range of colors than the standard sRGB profile that most of the web runs on. When you drag that Display P3 screenshot into a design tool that defaults to sRGB, it clips all those extra vibrant colors, making them look flat.
To keep your colors looking rich and accurate, you need a color managed workflow from start to finish. In a tool like Figma, you can set your canvas's color profile and, this is the critical part, choose "Display P3" when you export the final image. This preserves the colors your users will actually see on their devices.
“What’s the Best File Format for App Store Screenshots?”
Simple answer: PNG.
For both the Apple App Store and Google Play Store, PNG is the way to go. JPGs might give you a smaller file size, but their lossy compression creates visual artifacts and softens the sharp edges of your UI and text. That is the exact opposite of what you want.
PNGs use lossless compression, so you do not sacrifice any quality. Since the stores are going to compress your image anyway, give them the cleanest possible source file. You will end up with a much sharper final result for users. There is really no good reason to use JPG here.
“Can I Just Use My iPhone Screenshots for the iPad Listing?”
Technically, you sometimes can. But you absolutely should not. It is a huge missed opportunity and, frankly, it looks lazy.
Apple requires separate, correctly sized screenshots for the iPad for a good reason. The user experience is different. A phone screenshot stretched onto a tablet listing screams that you did not bother to optimize your app for the larger screen.
It fails to show users how your app actually takes advantage of the extra real estate. Always capture high resolution screenshots natively for each device. This small bit of effort shows a commitment to quality that can seriously boost your app's credibility and convince more people to hit that download button.
Ready to stop wrestling with design tools and start creating stunning, high converting visuals in minutes? ScreenshotWhale provides professionally designed templates and an AI powered localization engine to automate your entire screenshot production workflow. Create your first set of beautiful app store screenshots today.