
How to Create High-Converting App Store Screenshots for iPad
how to screenshot on a ipad: A quick, step-by-step guide across all iPad models, with editing and sharing tips to perfect your screen captures.
Grabbing a quick screenshot on your iPad is one of those things that feels second nature once you know the trick. It all comes down to which buttons you need to press, and that depends entirely on whether your iPad has a Home button or not.
For iPads without a Home button (like most of the newer models), you'll press the Top button and the Volume Up button at the same time. If your iPad still has that classic round Home button, your combo is the Top button and the Home button. Simple as that. This simple action is the first step toward creating visuals that can significantly boost your app store growth.
Your Instant Guide to Taking an iPad Screenshot
Capturing what's on your screen is a daily essential, but for app developers, it's the foundation of marketing. You might be capturing your app's killer feature in action, a glowing user review, or a perfect frame from a tutorial video. Whatever the reason, knowing the right button combo for your specific iPad makes it seamless to gather your raw assets for high-converting app store screenshots.
This little visual guide breaks it down perfectly.
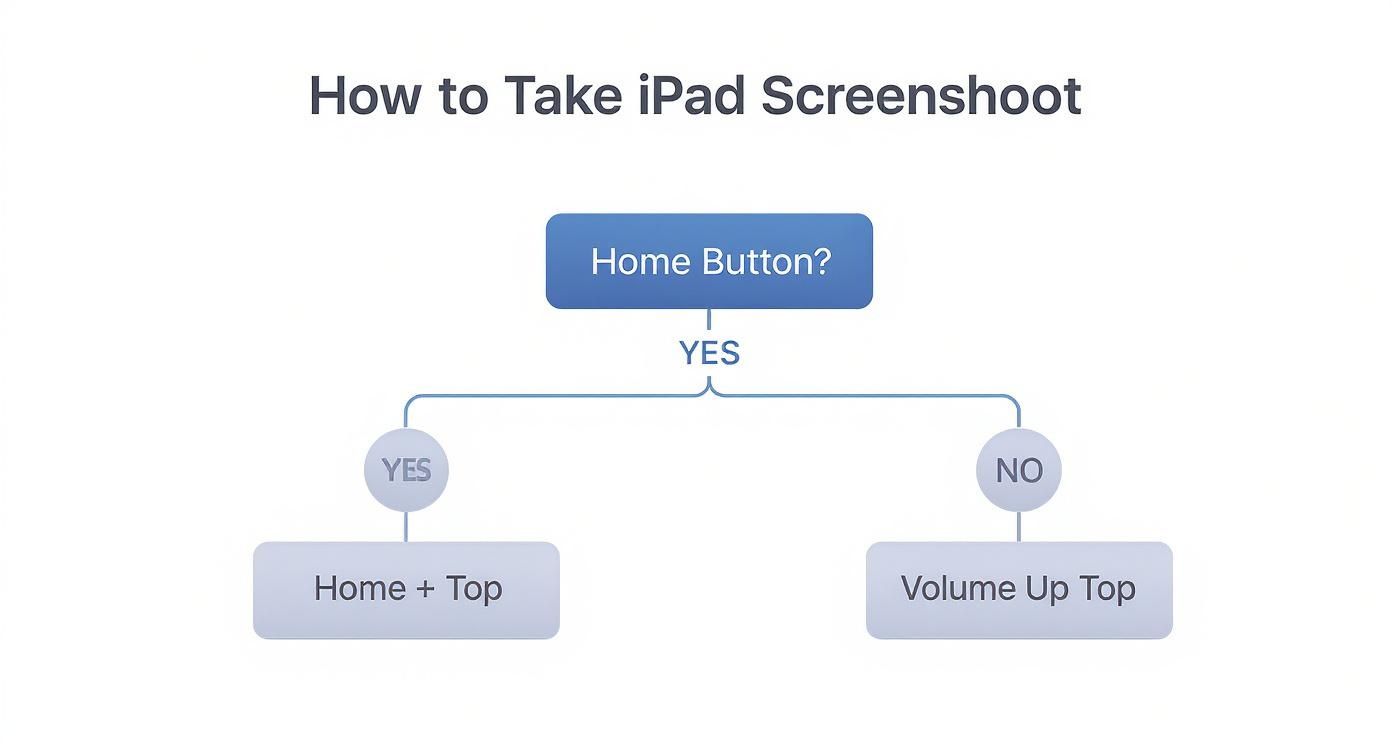
As you can see, the only thing that matters is the Home button. Apple kept the process intuitive, so you can focus on capturing the perfect moment to showcase your app, not fumbling with the hardware.
iPad Screenshot Methods by Model
Still not sure which category your iPad falls into? This table should clear things up instantly. Just find your model type to see the exact button combination you need.
| iPad Model Type | Button Combination | Key Feature |
|---|---|---|
| iPad Pro (Face ID) | Top Button + Volume Up | No Home button |
| iPad Air (5th gen) | Top Button + Volume Up | Touch ID in Top button |
| iPad (10th gen) | Top Button + Volume Up | Touch ID in Top button |
| iPad mini (6th gen) | Top Button + Volume Up | No Home button |
| All other iPads | Top Button + Home Button | Physical Home button |
Whether you're rocking the latest iPad Pro or an older model that’s still going strong, there's a straightforward two-button press to get the job done.
The Logic Behind the Buttons
The specific button combinations are designed to be a quick, deliberate action, something you won't do by accident. Apple's own guidelines are clear: you need a simultaneous press and a quick release.
When you do it right, you'll see a brief white flash on the screen and hear a shutter sound (if your sound is on). It's instant confirmation that you got the shot.
This simple, effective design is a big part of the user experience. In fact, mobile usability studies have shown that first-time users get it right over 95% of the time. It's a small detail, but that kind of reliability is exactly why the iPad's core features feel so polished and satisfying to use. If you're interested in this stuff, it's worth reading more about how mobile UX design directly impacts user satisfaction.
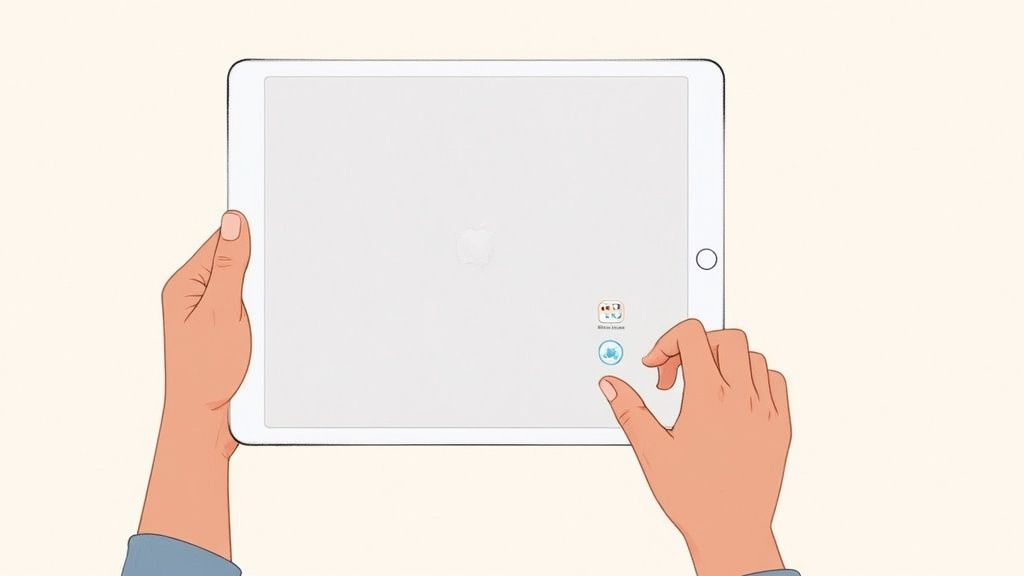
Screenshotting on iPads with a Home Button
If your iPad still rocks that classic, circular Home button right below the screen, you're in the right place. This is the old-school and arguably the simplest way to snap a screenshot. There are no fancy gestures, just a quick, satisfying button press perfect for capturing your app's best angles.
Learning the move is incredibly straightforward.
The trick is to press two buttons at the exact same time: the Top button (you might know it as the power or sleep/wake button) and the Home button.
Just give them a quick, simultaneous press and let go. Timing is everything here. If you hold them down for even a second too long, you might accidentally wake up Siri or pull up the power-off screen. It’s more of a quick click than a long press.
Knowing You Got the Shot
Your iPad gives you instant confirmation when you get it right. You’ll see the screen flash white for a split second and, if your volume is up, you'll hear that familiar camera shutter sound. That’s your signal that the screenshot was captured successfully.
A moment later, a small thumbnail of the image you just took will pop up in the bottom-left corner of your screen.
This comes in handy all the time. Imagine you're preparing your App Store visuals. You can quickly capture your app's onboarding flow, a key results screen, or a moment of user delight. The quick press-and-flash lets you capture what you need and move on to the next shot.
Pro Tip: Don't feel rushed to tap the thumbnail preview that appears. Every single screenshot you take is saved to your device automatically, whether you interact with the preview or not.
Finding Your Saved Screenshot
So, where did that screenshot go? Simple: it’s sent straight to your Photos app.
Here's how to track it down:
- Open the Photos app from your Home Screen.
- Tap the Library tab at the bottom. Your screenshot will be the most recent item at the very top.
- For a more organized view, head over to the Albums tab. You'll find a dedicated "Screenshots" album where all your screen captures are neatly filed away.
This setup makes it super easy to find what you've saved, so you’re not left digging through random folders. It just works.
Taking Screenshots on iPads Without a Home Button
If you’ve picked up a newer iPad Pro, Air, or Mini recently, you’ve probably noticed something missing: the classic Home button. Its departure made way for those gorgeous edge-to-edge screens, but it also changed a fundamental action we all rely on, taking a screenshot. The good news is, the new method is just as quick and is the key to creating modern, high-converting app store screenshots for the iOS store.
To grab a shot of your screen, just press and immediately release the Top button and the Volume Up button at the same time. The key here is a quick, decisive click. If you hold the buttons down for too long, you'll end up seeing the "slide to power off" screen instead, which can be a little frustrating at first.
This two-button press is the same gesture used on the iPhone X and all later models, which shows how Apple is creating a more unified experience across its devices. It's a small change, but it's part of a bigger design evolution. You can actually see a cool visual history of how iPad gestures have evolved over the years to learn more about this design journey.
Why This Method Is a Game-Changer
This button combination is built for speed. Imagine you're a designer reviewing a mockup in an app like Figma. A quick snap lets you capture a specific frame and send it over to your team for feedback in seconds. Or maybe you're a developer capturing screens for an App Store submission. You can grab multiple high-quality shots instantly without fumbling around.
The action is so fast it quickly becomes muscle memory.
Once you take the screenshot, a small thumbnail preview pops up in the bottom-left corner. This little preview is your gateway to a whole productivity workflow that, in my experience, most people completely overlook.
Don't Ignore the Instant Thumbnail
Tapping on that thumbnail opens up an editing interface right away, no need to go digging through your Photos app. This is where the real magic happens for creating compelling visuals. From here, you can do a few incredibly useful things on the spot:
- Crop It: Immediately trim away the extra stuff on the screen to focus on your app's UI.
- Mark It Up: Use the built-in pens and highlighters to call out a key feature or benefit.
- Share It: Send the screenshot directly to a design tool or a team member without saving it first.
Once you’re done, you can save the final image to Photos or Files. This efficient process lets you capture and refine your raw assets for the iOS store, moving you one step closer to boosting app store growth and conversions.
Going Beyond the Basics: Advanced Screenshot Tricks
Once you’ve got the basic button combos down, it’s time to unlock the real power hidden in your iPad’s screenshot tools. These aren’t just minor features; they can completely change how you create efficient and high-converting app store screenshots. It’s about moving past a simple screen grab and turning it into a powerful marketing tool.
One of the best-kept secrets is the full-page, scrolling screenshot in Safari. After you snap a screenshot of a webpage showcasing your app, you’ll see that little thumbnail pop up in the corner. Tap it. At the top of the editor, you'll find two options: "Screen" and "Full Page."
Go ahead and tap Full Page. Just like that, your iPad captures the entire webpage, top to bottom. This is a game-changer for saving long articles featuring your app, archiving a whole set of user testimonials, or grabbing an entire landing page as a single, clean PDF for your marketing assets.
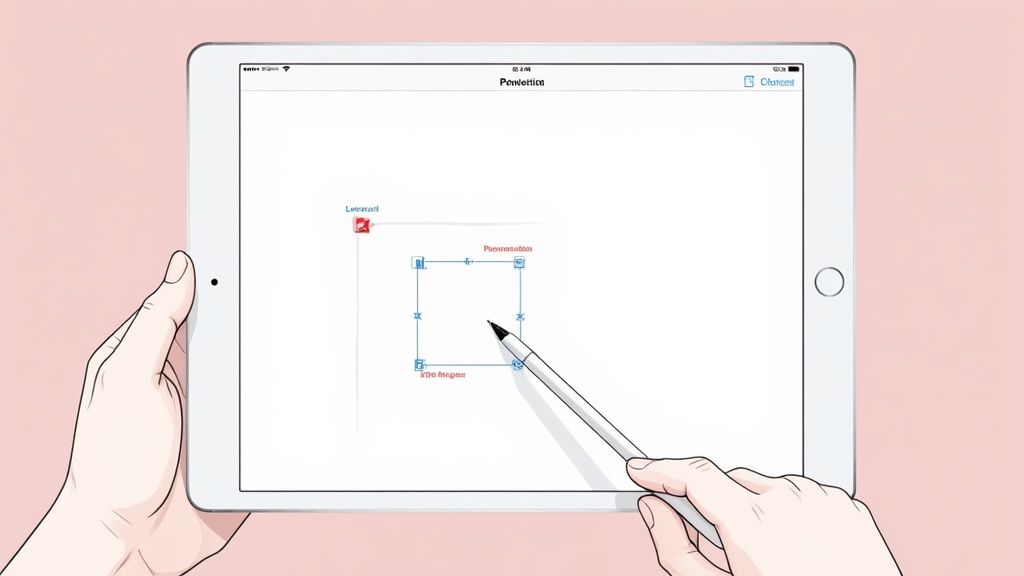
Precision Markups with Apple Pencil
If you own an Apple Pencil, screenshots transform from static images into a dynamic canvas. The second you tap that thumbnail preview, you can start marking it up, drawing, highlighting, and jotting down notes. This is an actionable insight for designers looking to create stunning visuals that drive downloads.
Imagine you're designing your app store presence. You can take a screenshot of your app's main screen and use the Pencil to sketch out where to place compelling call-to-action text like "Track Your Progress Instantly" or "Unlock Exclusive Content." This immediate, visual brainstorming is perfect for creating efficient and high-converting app store screenshots for both the Android and iOS stores.
This instant markup feature is a huge time-saver. It closes the gap between an idea and a visual concept, making your design workflow for app store assets much more intuitive.
Single-Tap Screenshots with AssistiveTouch
Let's be honest, pressing button combinations can be clumsy. Thankfully, Apple built in a much easier way: setting up a single-tap screenshot with AssistiveTouch.
Here’s how to get it going:
- Head over to Settings > Accessibility > Touch.
- Tap AssistiveTouch and flip the switch on. You'll see a little floating button appear on your screen.
- Now, under the "Custom Actions" section, you can assign "Screenshot" to a Single-Tap, Double-Tap, or Long Press.
Once that's set up, you just tap the on-screen button to grab a screenshot, no physical buttons required. It's not only fantastic for accessibility but also super handy for capturing the perfect moment in your app with one hand. While this is an iOS-specific trick, most platforms have similar accessibility features. For a look at how the other side does it, check out our guide on how to capture a screenshot on Android.
How to Edit and Manage Your iPad Screenshots
Taking the screenshot is just the first step. What you do next is what turns a simple screen capture into a powerful asset for boosting app store growth and conversions.
The moment you snap a screenshot, a small thumbnail preview pops up in the corner of your screen. My advice? Don't just swipe it away. Tapping that little preview immediately opens up a surprisingly powerful editing suite, letting you make quick changes without ever leaving the app you're in.
This built-in editor is perfect for those essential, on-the-fly tweaks. You can crop out the clutter to focus on what really matters, use the highlighter to draw attention to a specific number, add a quick text note for context, or even drop in a digital signature. It's incredibly convenient.
Organize Your Captures Effectively
If you're creating assets for the App Store, your screenshot collection can get out of hand fast. To keep your iPad's photo library from turning into a chaotic mess, it’s worth learning how to organize digital photos, and that includes your screenshots.
The easiest method is to create dedicated albums right in the Photos app. This is a game-changer for your workflow.
Think about creating a few specific albums like these:
- App Store Raw Shots: A single spot for all initial captures.
- Design Inspiration: Perfect for saving compelling UI from other apps.
- Final App Store Visuals: Keep your polished, ready-to-upload screenshots here.
This simple habit keeps your main camera roll clean and makes finding a specific capture weeks or months later a breeze. By creating an efficient process for asset management, you're better positioned to produce high-converting app store screenshots.
Sharing is just as easy as editing. Straight from the editor, you can send your screenshot via AirDrop or Messages, or save it directly to a shared cloud folder like iCloud Drive or Dropbox.
This seamless workflow is no accident. In fact, an estimated 80% of iPad users take screenshots monthly, cementing its place as one of the most-used features on the device. It’s a small function with a huge impact on everyday productivity.
Common Questions About iPad Screenshots
Even a process as straightforward as taking a screenshot can have its little quirks. If you’ve run into a snag or are just curious about some of the more advanced features, you're not alone. Let's walk through a few of the most common questions I hear.
Why Won't My iPad Take a Screenshot?
More often than not, this comes down to timing. When you're learning how to screenshot on an iPad, the key is to press the buttons together and let go almost instantly. If you hold them down for even a second too long, you’ll end up triggering Siri or the power-off screen instead.
If the timing feels right but it’s still not working, a quick restart can often clear up minor software glitches. It’s also worth checking your iPad case, sometimes a bulky case can prevent the buttons from being fully pressed down.
Where Do Full-Page Screenshots Go?
This one trips people up because it’s different from a standard screenshot. While a regular screenshot saves as a PNG or JPG right into your Photos app, a full-page capture is handled as a PDF document.
After you take the shot and tap the "Full Page" option in the editor, hitting 'Done' brings up a prompt to 'Save PDF to Files.' From there, you can tuck it away in any folder you like, whether that’s on your iPad itself or in iCloud Drive.
Is There a Way to Screenshot Without Using the Buttons?
Absolutely. Apple has a fantastic accessibility feature called AssistiveTouch that makes this possible.
To set it up, head over to Settings > Accessibility > Touch > AssistiveTouch. Once you flip it on, a little floating button will appear on your screen. You can customize its menu to add a 'Screenshot' command, giving you a one-tap way to capture your screen. It’s a handy trick that works similarly on other devices, which we cover in our guide on how to take a screenshot with an iPhone.
While we're focused on the practical side here, the idea of capturing what’s on-screen is a big deal in professional fields, too. For instance, in digital marketing, the practice of understanding 'ad screenshots' is crucial for verifying campaigns and analyzing competitor strategies.
Ready to make your app stand out? With ScreenshotWhale, you can create stunning, high-converting screenshots for the App Store and Google Play in minutes. Stop guessing and start designing visuals that drive downloads. Start for free on screenshotwhale.com.