How to Take a Screenshot with iPhone A Pro's Guide
Learn how to take a screenshot with iPhone using every method available. From basic buttons to advanced tips for creating polished App Store visuals.
Knowing how to grab a quick screenshot on your iPhone is a fundamental skill, whether you're saving a funny text, grabbing a receipt, or capturing pixel-perfect visuals for the App Store. Getting the shot you need without fumbling comes down to muscle memory, and luckily, Apple keeps it pretty simple.
The method you will use depends entirely on one thing: does your iPhone have a physical Home button?
For any modern iPhone with Face ID (think iPhone X and all newer models), the process is the same. Just give the Side button and the Volume Up button a quick, simultaneous press. That is it. You will hear the shutter sound, and a thumbnail will pop up in the corner.
This is the standard for the vast majority of iPhones out there today. Given that iPhones hold such a huge share of the market, mastering this one combo will serve you well on almost any device you pick up. If you're curious about the bigger picture, it is always interesting to check out the latest data on mobile photography trends and market statistics.
This simple decision tree breaks it down visually.
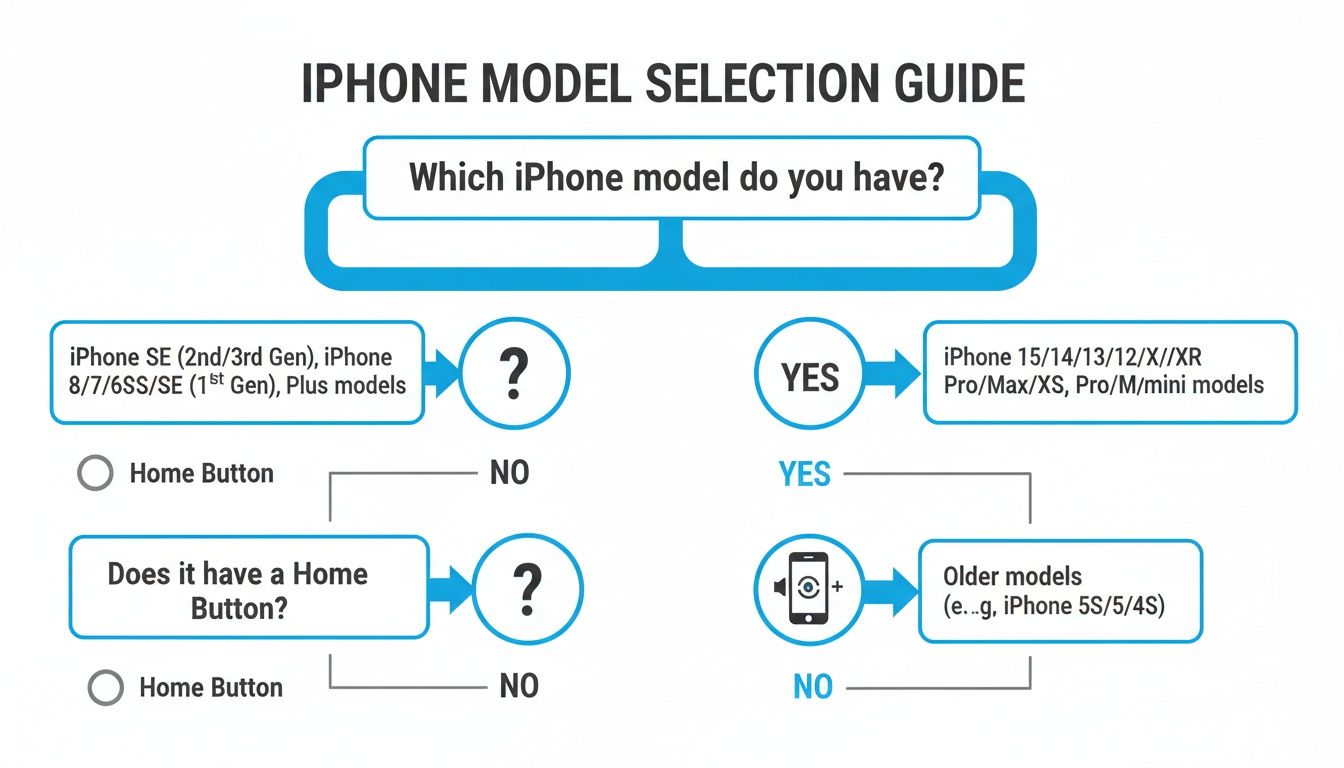
Ultimately, the physical Home button is the only thing that changes the formula. If you have one, you will use it. If not, it is all about that Side and Volume Up combo.
Button Combinations for All Models
To make things even clearer, here is a quick reference table. This is especially handy when testing on multiple devices or creating app store screenshots for various screen sizes and older iOS versions.
iPhone Screenshot Methods at a Glance
| iPhone Model Type | Button Combination |
|---|---|
| iPhone with Face ID | Press Side + Volume Up buttons |
| iPhone with Home Button | Press Side/Top + Home buttons |
This table covers every model out there, so you will always know which buttons to press.
The key is a quick, crisp press-and-release. If you hold the buttons down for too long, you will either activate Siri or bring up the power-off screen, which is a common mistake. Getting the timing right ensures a clean screenshot every time, something that is absolutely essential when you're trying to create polished, professional-looking visuals for the App Store. It is a small detail that saves a ton of time and frustration.
Mastering the Go-To Screenshot Methods
Knowing which buttons to press is one thing, but getting the timing right separates a clumsy fumble from a perfect capture. It is a subtle art, and the exact move changes depending on your iPhone model, but the core idea is always a quick, decisive press.
iPhones with Face ID
If you're using a modern iPhone with Face ID, anything from the iPhone X to the latest models, your magic combo is the Side button and the Volume Up button.
Press and release them at the exact same time. The key here is speed. If you hold them down for even a second too long, you will end up triggering Siri or the power-off screen instead. Just think of it as a quick, sharp tap.
iPhones with a Home Button
For those still rocking an older model with a physical Home button, like an iPhone 8 or SE, the method is a classic. You will press the Side (or Top) button and the Home button simultaneously.
It is a straightforward action that millions of us do every day, contributing to the content we share on our phones, where people spend an average of 5.6 hours daily.
No matter which iPhone you have, a successful screenshot gives you instant feedback: a quick flash on the screen and a camera shutter sound (as long as your ringer is on). A moment later, a little thumbnail preview slides into the bottom-left corner. This is where the real magic happens for boosting your app's visibility.
That little thumbnail is not just a confirmation. It is your launchpad. It lets you instantly edit, share, or delete the screenshot without ever having to dig through your Photos app.
Making the Most of the Thumbnail Preview
Once that thumbnail appears, you have a small window to act. If you do nothing, it will vanish after a few seconds and save the screenshot right to your Photos. This is perfect when you're trying to grab several shots in a row for an app feature showcase.
But if you interact with it, you unlock some serious shortcuts for creating high-converting app store screenshots:
- Tap it: This is your express ticket to the Markup editor. From here, you can immediately crop, draw, add text, or use any other annotation tool to highlight key features for potential users.
- Swipe it to the left: This is the fastest way to dismiss it. The screenshot saves to your Photos, and your screen is instantly clear for the next capture.
- Press and hold it: This is a pro-move. It bypasses the editor and brings up a share sheet, so you can send the screenshot to a design tool like Canva or your Mac without saving it first, streamlining your workflow.
Getting comfortable with these thumbnail tricks is a massive timesaver, especially if you're creating a set of visuals for an app store listing. If you're looking to explore image capturing techniques even further, you can learn more about screenshots and see how they apply in a wider context.
Look, physical buttons get the job done, but they are not always the best tool for the task. Ever tried to time a screenshot perfectly in an app, only to have the button press cause a tiny shake and ruin the shot? It is frustrating. For creating clean, professional visuals that drive app store growth, you need a steady hand, and that is where button-free methods come in.
These are not just gimmicks; they are powerful accessibility features that double as incredible shortcuts. They're great for reducing wear and tear on your phone's buttons or for those times when you absolutely need to operate your phone with one hand.
Activate Screenshots with AssistiveTouch
AssistiveTouch gives you a floating, programmable button right on your screen. Think of it as a virtual home button that you can load up with your most common actions, including taking a screenshot.
Setting it up is a breeze.
- Just head over to Settings > Accessibility > Touch.
- Tap AssistiveTouch and flip the switch on. You will see a small grey circle pop up on your screen.
- Now, under Custom Actions, pick either Single-Tap, Double-Tap, or Long Press.
- Scroll through the list of actions and select Screenshot.
And that is it. A simple tap on that on-screen button now snaps a screenshot, no physical buttons required. This is a go-to method for capturing precise moments in an app walkthrough for your Android or iOS store listings.
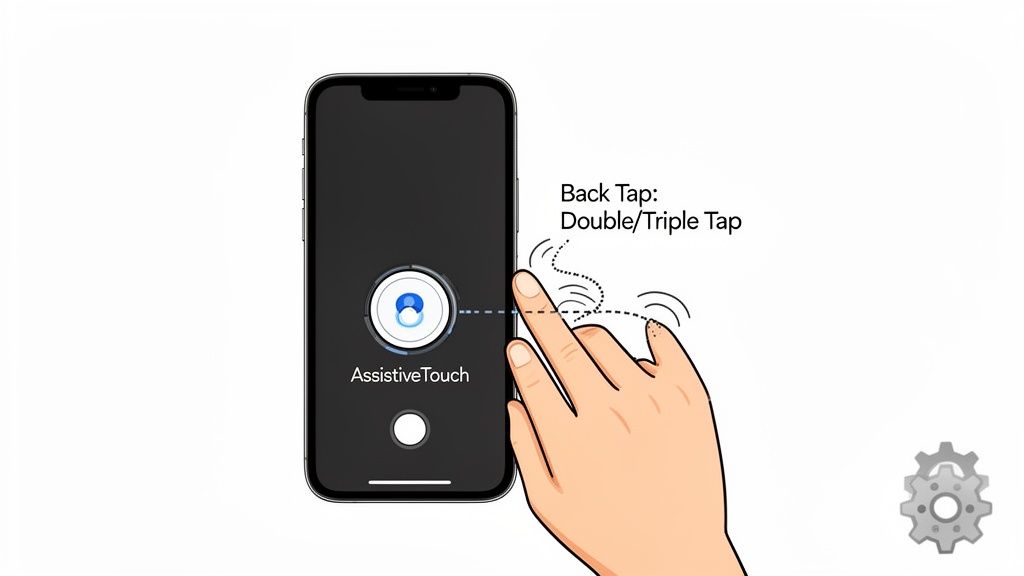
Use Back Tap for Instant Captures
One of the slickest features Apple has added in recent years is Back Tap. It literally turns the back of your iPhone into a button, which is perfect for firing off a quick screenshot without even thinking about it.
This feature is an absolute game-changer for one-handed use. Picture yourself holding your phone to show someone an app's interface. You can discreetly tap the back with your index finger to grab the perfect shot without fumbling.
Here is how to get it going:
- Navigate to Settings > Accessibility > Touch.
- Scroll all the way down and choose Back Tap.
- Decide if you want to use Double Tap or Triple Tap.
- Select Screenshot from the list of system actions.
Once enabled, a quick double or triple tap near the Apple logo is all it takes. It honestly feels like magic the first few times you use it, and it is surprisingly reliable.
Capture Entire Pages with a Single Tap
Sometimes, a regular screenshot just does not cut it. You have been there, right? Trying to capture a long landing page, a detailed article, or maybe a full user flow for a design mockup. That is where the Full Page screenshot comes in, and it is a total game-changer built right into your iPhone.
This is not just a gimmick; it is a massive productivity booster for app marketers and designers. Instead of clumsily stitching multiple images together, you can grab an entire scrollable webpage or document and save it as one clean, continuous PDF. For developers, this is an incredible way to showcase web-based features or create comprehensive mockups for your App Store or Google Play listings.
How to Take a Full Page Screenshot
The process is surprisingly simple and piggybacks on the normal screenshot gesture you already know.
- First, open up Safari, Mail, or another supported app and get the page you want to capture on screen.
- Go ahead and take a screenshot just like you normally would.
- When the little thumbnail preview pops up in the bottom-left corner, tap on it. Do not let it disappear!
- Look at the top of the editor. You will see two options: Screen and Full Page.
- Just tap Full Page.
And that is it. You will now see a preview of the entire scrollable area. There is a handy slider on the right that lets you navigate the full length of the page. You can even use it to crop the page vertically if you only need a specific section before saving.
This is one of those features that saves you more time than you would think. Capturing a long email thread or an entire user agreement as a single, searchable PDF keeps your documentation clean and incredibly easy to manage.
Once you are happy with it, tap Done. Here is the key difference: your iPhone will prompt you to save the file as a PDF to your Files app, not as a standard image in Photos. It is the perfect way to create professional-looking visuals without firing up a photo editor.
Turn Good Screenshots into Great App Store Visuals
Snapping the screenshot is the easy part. But a raw screen capture rarely looks professional enough for the App Store, where sharp, clear visuals are what convince people to download your app. Think of it this way: you are not just showing a feature, you are selling it. Luckily, your iPhone has some powerful editing tools built right in to help you do just that.

The moment you tap that little thumbnail preview in the corner, you are in the Markup editor. This is your canvas for turning a basic screenshot into a visual that guides a user’s eye and makes your app’s best features impossible to miss. This is your first stop for creating efficient and high-converting app store screenshots for both Android and iOS stores.
Point Out What Matters with Annotations
The Markup toolbar is surprisingly versatile. It gives you all the tools you need to draw attention to specific UI elements or explain a workflow without cluttering the image.
- Shapes and Arrows: Need to highlight a "Buy Now" button? Circle it. Want to show the next step in a process? Use an arrow. It is simple but incredibly effective for guiding the user's eye and boosting conversions.
- Magnifier Loupe: This is a personal favorite. Drag the magnifier over a tiny icon or a critical piece of text to make it pop. It is a clean way to zoom in on details without confusing the user.
- Text Tool: Sometimes an image needs a little context. You can add short, punchy captions directly on the screenshot to explain the benefit of a feature. For example, instead of just showing a settings screen, add text that says, "Customize in Seconds!"
A well-placed arrow or a magnified detail can be the difference between a potential user understanding your app's value and just scrolling right past it. Treat every screenshot like a mini-advertisement.
Crop for a Clean, Professional Look
First rule of App Store screenshots: never upload a raw, uncropped image. Use the cropping tool to slice off the status bar, the Home indicator, and anything else that is not part of your app's core interface. This immediately makes the image look cleaner and keeps the focus entirely on your app.
App developers know how critical it is to get the dimensions right for the App Store. For example, screenshots for a 6.7-inch display have to be 2796 × 1290 px.
Just like in e-commerce, compelling visuals directly impact sales, or in this case, downloads. If you want to dive deeper into creating images that sell, these e-commerce photography tips for compelling visuals have some great transferable insights.
To take your visuals to the next level, you can place your perfectly cropped screenshots inside device frames. An iPhone PNG mockup can give your App Store page a much more polished and professional feel.
And here is a final efficiency tip: use the Copy and Delete option. This is a lifesaver when you need to quickly paste a screenshot into a Slack message or a bug report without saving it to your Photos and cluttering up your camera roll.
Common Questions About iPhone Screenshots
Even something as simple as taking a screenshot can have its quirks. From failed attempts to just figuring out where the heck the image went, a few quick answers can make all the difference. Let us tackle some of the most common things people run into.
Why Won't My iPhone Take a Screenshot?
Nine times out of ten, this is just a timing issue. You have to press and release the button combo at the exact same time. If you are off by even a fraction of a second, you might just lock your screen or accidentally wake up Siri. It happens to all of us.
If you swear you're getting the timing right and it is still not working, give your iPhone a quick restart. That little trick can clear up all sorts of minor software glitches. One last thing to check: make sure you have enough storage. A completely full iPhone has no place to save a new screenshot.
Where Do My Screenshots Go?
All your screenshots land directly in the Photos app. Apple keeps them organized for you in two key spots:
- Library Tab: You will find them mixed in with all your other photos, sorted by the date you took them.
- Albums Tab: The real goldmine is here. Scroll down and you will find a dedicated "Screenshots" album that gathers every single one in one neat place.
Here is a pro tip: If you use the "Copy and Delete" option from the little thumbnail preview, the screenshot gets copied to your clipboard but never saves to your Photos. It is a fantastic way to share something quickly without cluttering up your camera roll.
Can I Screenshot a Video?
Absolutely. Just use the same button combination you always use while the video is playing, and you will capture whatever frame is on the screen.
For the cleanest shot, pause the video at the exact moment you want to capture. This helps you avoid any motion blur and get a perfectly crisp image.
How Do I Take a Screenshot Without the Sound?
That little shutter click is tied directly to your iPhone's ringer volume. The easiest way to get a silent screenshot is to just flip the Ring/Silent switch on the side of your phone.
When you see the orange bit, your phone is in silent mode, and any screenshot you take will be completely quiet. It is the perfect trick for capturing something discreetly. And once you have got your shots, you might want to learn more about how to upload a screenshot to your favorite apps and services.
Ready to create stunning, high-converting visuals for your app? With ScreenshotWhale, you can design professional App Store and Google Play screenshots in minutes using beautiful templates and a simple editor. Stop struggling with image editors and start driving downloads. Try ScreenshotWhale for free!