
How to Upload a Screenshot for the App Store
Learn how to upload a screenshot that boosts app downloads. Our guide offers actionable tips for creating high-converting visuals for iOS and Android.
Before you upload a single file, let's focus on creating screenshots that convince people to download your app. The best app store listings tell a story at a glance. They grab your attention and instantly highlight the app's core features and, more importantly, its benefits for high-converting results.
You need to lock in on your app's "aha" moment: that one killer feature that makes a user's life easier or more fun. That is what you build your visuals around to boost app store growth.
Prepare Your Screenshots for Maximum Impact

The foundation of a great launch is not just the code; it is the presentation. Your screenshots are your most powerful sales tool on your product page. They must communicate value in seconds to turn a casual browser into a loyal user. Think of them as your visual elevator pitch, essential for boosting conversions on the Android and iOS stores.
This process starts by figuring out your key selling points. Do not just show random screens. That is a common mistake. Instead, map out a user journey that tells a compelling story. What problem does your app solve? How does it make the user feel? Capture the screens that answer those questions.
Craft a Cohesive Visual Narrative
Every screenshot needs to feel like it belongs to the same family. A consistent visual theme is critical for building trust, reinforcing your brand, and looking professional.
Here are a few actionable insights:
- Consistent Branding: Stick to your app's color palette, fonts, and logo across all images. For example, within a site editor, you can create a brand preset with your hex codes and font choices to apply them instantly to every screenshot, ensuring a professional, cohesive look.
- Clear Typography: Pick a font for your text overlays that is dead simple to read. Keep captions short, punchy, and focused on the user benefit, not just the feature name.
- Strategic Storytelling: Arrange your screenshots in a sequence that makes sense. The first one must nail your main value proposition. The ones that follow should back it up by showcasing other key features.
Your first two or three screenshots are everything. They are what people see "above the fold" without scrolling. If they are not compelling, you have lost them. They will not bother to scroll for the rest.
Nail the Technical Requirements
Nothing screams "amateur hour" faster than pixelated or stretched images. Both the Apple App Store and Google Play have strict guidelines for dimensions and resolutions, and they change with new device releases. You have to stay on top of it.
For a deep dive into the specifics, check out our complete app store screenshot guidelines. This is one of those details you cannot afford to get wrong.
Getting the technicals right is a quick way to see what you’re up against for both major platforms. Here’s a quick reference table I put together to keep the essentials straight.
Essential App Store Screenshot Specifications
This table breaks down the must know specs for iOS and Android, so you can make sure your designs are compliant from the start.
| Specification | Apple App Store (iOS) | Google Play Store (Android) |
|---|---|---|
| Minimum Screenshots | 1 (up to 10) | 2 (up to 8) |
| Common Sizes (iPhone) | 1290 x 2796 px (6.7") 1170 x 2532 px (6.1") |
Varies by device, no strict sizes |
| File Format | JPEG or PNG (no transparency) | JPEG or 24-bit PNG (no transparency) |
| Aspect Ratio | Portrait or Landscape | No specific ratio, flexible |
| Localization | Required for each language | Required for each language |
Remember, this is just a starting point. Always double check the latest developer documentation before you finalize your assets, as guidelines can and do change.
This level of polish matters more than ever. The global photo sharing market hit a valuation of $5.38 billion in 2024 and is on track to reach $5.69 billion in 2025. That growth tells you one thing: user expectations for high quality visuals are only going up. You can see more on these photo sharing market trends over at TheBusinessResearchCompany.com.
Streamline Your Upload Workflow
Okay, you have your visuals prepped and ready to go. Now comes the part that used to be a massive headache: getting them into the app stores. This is where a dedicated site editor changes the game, turning a tedious chore into a quick, strategic part of your launch. It is not just about uploading files; it is about having a central command center to organize, preview, and deploy your high converting screenshots with total confidence.
Instead of wrestling with a dozen different folders, a good editor offers a clean drag and drop interface. This is your single source of truth. You can create specific sets for various phones and tablets, making sure every single one is perfectly optimized. This simple step helps you dodge a common pitfall: uploading mismatched images that make your app look unprofessional.
Master the Upload Process
The secret to a fast, repeatable workflow is leaning on features that kill repetitive tasks. Bulk uploading is a total game changer here. Forget adding images one by one. You can upload an entire collection for a device family all at once, which easily shaves a huge amount of time off the process.
It all starts with getting the initial shot, of course.
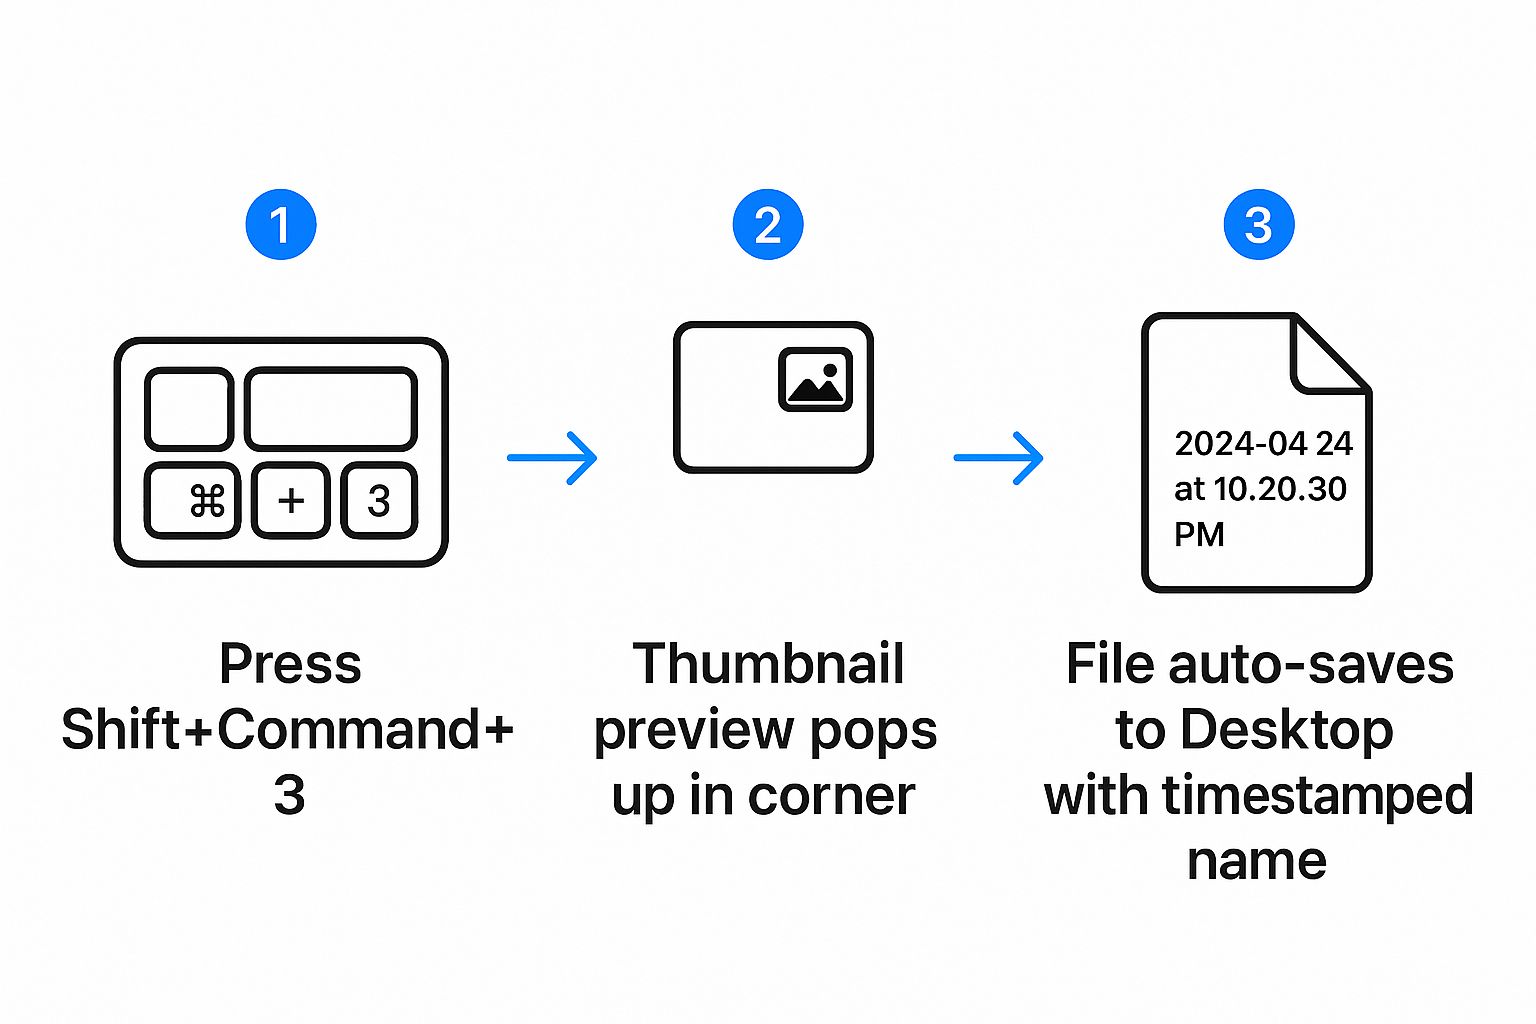
This just shows the native capture method on macOS, which is usually the very first step before you bring the raw files into an editor to turn them into polished app store assets.
If you are building a global app, the ability to assign different screenshot sets to specific countries is invaluable. You can tailor your visuals and captions for each market right inside the editor, without creating a mess of different project files. For instance, you could change a caption from "Book a Ride" to "Réservez une Course" and swap background imagery for a local landmark, all within the same streamlined workflow.
My biggest tip: Use the live preview mode constantly. A quality site editor will show you exactly how your screenshots will look on the App Store and Google Play before you commit. This final check is your safety net for spotting awkward layouts or text that is impossible to read on a real device screen.
Once your screenshots are uploaded, organized, and previewed, you are on the home stretch. For a complete walkthrough of what comes next, our guide on how to publish your app in the app store breaks down all the final steps.
Visuals That Actually Drive Downloads
Let's get one thing straight: an effective screenshot is more than just a picture of your app. It is a powerful marketing asset designed to persuade. The visuals you upload are your front line in the battle for downloads, turning passive scrollers into engaged users and driving app store growth.
This means every single design choice has to be intentional. Your primary goal? Tell a compelling story, fast. A great way to start is by framing your app's UI within polished device mockups. It is a simple move that instantly gives your visuals a professional feel that builds trust.
Crafting High-Converting Captions and Backgrounds
The text you layer on top of your screenshots is as critical as the images. Keep your captions short, punchy, and focused on the benefit. Instead of a dry phrase like "Filter Results," try something like, "Find Your Perfect Match in Seconds." That simple shift focuses on the user's outcome, which is far more compelling for conversions.
Vibrant backgrounds with appealing, neat imagery are your secret weapon to make your app pop off the page. Use bold, on brand colors or subtle gradients to draw the eye and create a cohesive look across your entire screenshot set.
A tactic I love is the panoramic layout, where one continuous background image spans multiple screenshots. It is a clever way to encourage users to swipe through the whole gallery, guiding them seamlessly through your app's story. In an editor, you can achieve this by uploading one wide image and aligning each screenshot frame sequentially across it.
Of course, different platforms have different nuances. We put together a detailed guide on crafting compelling iOS app screenshots that dives deeper into platform specific strategies you can steal.
Connecting Your Visuals to a Bigger Narrative
Think beyond just the app store page. How do people discover apps? Often, it is through shared images and recommendations. Social media is a massive driver here. By 2025, there will be an estimated 5.45 billion users worldwide, and as Sonary.com points out, they spend over two hours a day on these platforms. That is a huge channel for organic discovery.
Your app store visuals need to be share worthy. They should create a consistent brand experience no matter where someone sees them. When you design with that purpose, you are creating powerful assets that boost app store growth and fuel discovery all over the web.
Optimize Your App Store Visuals Over Time

Getting your first set of screenshots live is a great first step, but the real work starts now. Think of your visuals as living assets, not a one and done task. To really move the needle on app store growth and conversions, you have to keep refining them.
The app market changes fast. What hooks users today might feel stale in six months. This is where ongoing testing can pay off big time.
Test and Refine for Higher Conversions
You do not have to burn everything down and start over. Small, focused A/B tests are your best friend here. By trying out different versions of your screenshots, you can get hard data on what actually convinces people to tap that "Install" button.
Here are a few simple but powerful things you can test:
- Caption Smackdown: Pit a benefit focused headline ("Reach Your Goals Faster") against a feature focused one ("Track Your Progress").
- Color Palette Wars: Does a vibrant, bold background with neat imagery grab more attention than a clean, minimalist design? Test it and find out.
- Device Mockups (or Not): Some audiences see device frames as professional, while others prefer a cleaner, frameless look. See what works for your users.
The biggest mistake I see developers make is "setting and forgetting" their store visuals. An evolving app store page signals that your app is alive and constantly improving. It builds trust before the user even downloads.
Stay Current with App Updates
Every time you ship a big update, you have the perfect excuse to refresh your visuals. Rolling out a game changing new feature or a slick UI redesign? Your screenshots absolutely must show it off.
This does two things: it keeps your store listing honest and gives potential users a reason to get excited about what is new.
And if you are thinking about global growth, localization is key. This is not just about translating text. It is about tailoring the entire visual, from the words to the imagery, to resonate with different cultures. Suddenly, uploading a screenshot is not just a task; it is a strategic cycle of testing, refreshing, and localizing to maximize your reach and conversions.
Even with a solid plan, upload errors are part of the game. Hitting a rejection notice from the App Store or Google Play is always frustrating. But do not worry, the culprits are usually simple technical mismatches that are easy to fix.
More often than not, the problem comes down to something small. The most common one I run into is incorrect image dimensions. One store might happily accept a size that the other flatly rejects, leading to annoying delays.
Another frequent headache is file size. High resolution PNGs can get surprisingly heavy, and if they sneak past the store’s limit, the upload will fail.
Getting Past Rejections and Failures
When an upload fails, the first thing to do is go back to the basics. Are your images in the right format, PNG or JPEG, with no transparency? And are the pixel dimensions exactly what the platform requires for that specific device?
Here are the top three problems I see time and again, along with the quickest ways to fix them:
- Incorrect Dimensions: If an image gets rejected for its size, do not just crop it. Instead, open a reliable image editor and resize the canvas to the exact dimensions required. This keeps your content intact.
- File Size Too Large: Compression is your best friend here. Tools like TinyPNG can slash your file size with almost no visible loss in quality. It is a simple step that makes a huge difference.
- Weird Colors: Ever upload a screenshot and the colors look washed out? That is almost always a color profile issue. Make sure you are saving your images in the sRGB color space. It is the universal standard for web and mobile devices.
An upload error is not a dead end; it is just feedback. The app store is telling you a specific rule was not met. Address that one thing, and you are right back on track.
Getting this process right has become more critical than ever. It is estimated that by 2025, people will take a staggering 2.1 trillion photos a year, and smartphones will account for about 94% of them. You can dive deeper into these global photo trends on Phototrend. By quickly tackling these minor upload issues, you ensure your app’s visuals stand out in a very crowded space.
App Screenshot Questions We Hear All the Time
Submitting to the app stores can feel like navigating a maze. One wrong turn and your update gets rejected. When it comes to screenshots, getting the details right is the difference between a smooth launch and a frustrating delay.
Let's clear up some of the most common questions we get from developers about getting their app store screenshots just right.
What’s the Best File Format for App Store Screenshots?
Stick with PNG. Both the Apple App Store and Google Play recommend it for a reason: it uses lossless compression.
What does that mean for you? Your UI elements, text, and graphics stay perfectly sharp. While a JPEG might give you a slightly smaller file, you risk getting fuzzy visuals. Your screenshots are your app's front door; you want them looking their best.
How Many Screenshots Should I Actually Upload?
The short answer: all of them. Apple gives you 10 slots per device, and Google Play gives you 8. Think of each empty slot as wasted marketing space.
Using every available spot gives you more chances to tell your story and convince someone to hit "install." This is a simple way to maximize your potential for app store conversions.
Your first two or three screenshots are everything. These are what people see without scrolling. They need to be your strongest, most persuasive visuals. Hook them immediately.
Do I Really Need Different Screenshots for Phones and Tablets?
Yes, absolutely. This is not just a box ticking exercise for Apple and Google; it is about user experience. When someone is browsing on their new iPad, the last thing they want to see is a stretched out, distorted phone screenshot. It just looks lazy.
Creating tailored visuals for each device shows you care about the details. It builds trust and gives users an accurate preview of what they are getting, which can have a real impact on your conversion rates.
Can I Change My Screenshots After My App Is Live?
Of course. You can, and should, update your screenshots every time you submit a new app version for review.
This is a golden opportunity to show off that new feature you just shipped, refresh your branding, or A/B test a new headline. Keeping your visuals current makes your app store page feel fresh and accurately reflects all the hard work you have put into the latest update.
Ready to create stunning, high-converting visuals for your app in minutes? ScreenshotWhale provides professionally designed templates and a powerful editor to make your app store listing shine. Start designing for free today.