
How to Take a Screenshot in Macbook The Ultimate Guide
Learn how to take a screenshot in Macbook like a pro. This guide covers shortcuts, advanced tools, and editing tips to capture your screen perfectly.
Taking a screenshot on your MacBook should be second nature, and thankfully, it's incredibly simple once you know the core commands. Forget digging through menus. The quickest ways are built right into your keyboard.
The two workhorses you'll use constantly are Command + Shift + 3 for grabbing your entire screen and Command + Shift + 4 for selecting a specific area. Honestly, these two cover about 90% of what I need to do on any given day.
Your Quick Guide to MacBook Screenshots
Mastering screenshots on a Mac is one of those small skills that pays huge dividends in productivity. For app developers and marketers, it is a crucial step in creating high-converting visuals for the App Store and Google Play. macOS gives you powerful, built in shortcuts that are easy to remember and lightning fast to use.
The native screenshot tool is a core feature across Apple’s entire ecosystem, which, as of March 2025, includes an estimated 2.08 billion active devices worldwide. The fact that Apple has kept these same basic shortcuts for over a decade shows just how effective they are. You can dig into more details about Apple device usage in recent industry reports.
The Essential Shortcut Commands
You really have three main shortcuts at your disposal, each offering a different level of control. This ensures you have the right tool for whatever you're trying to capture, from a full screen grab to something more precise.
This visual breaks down what each of the three main shortcuts does at a glance.
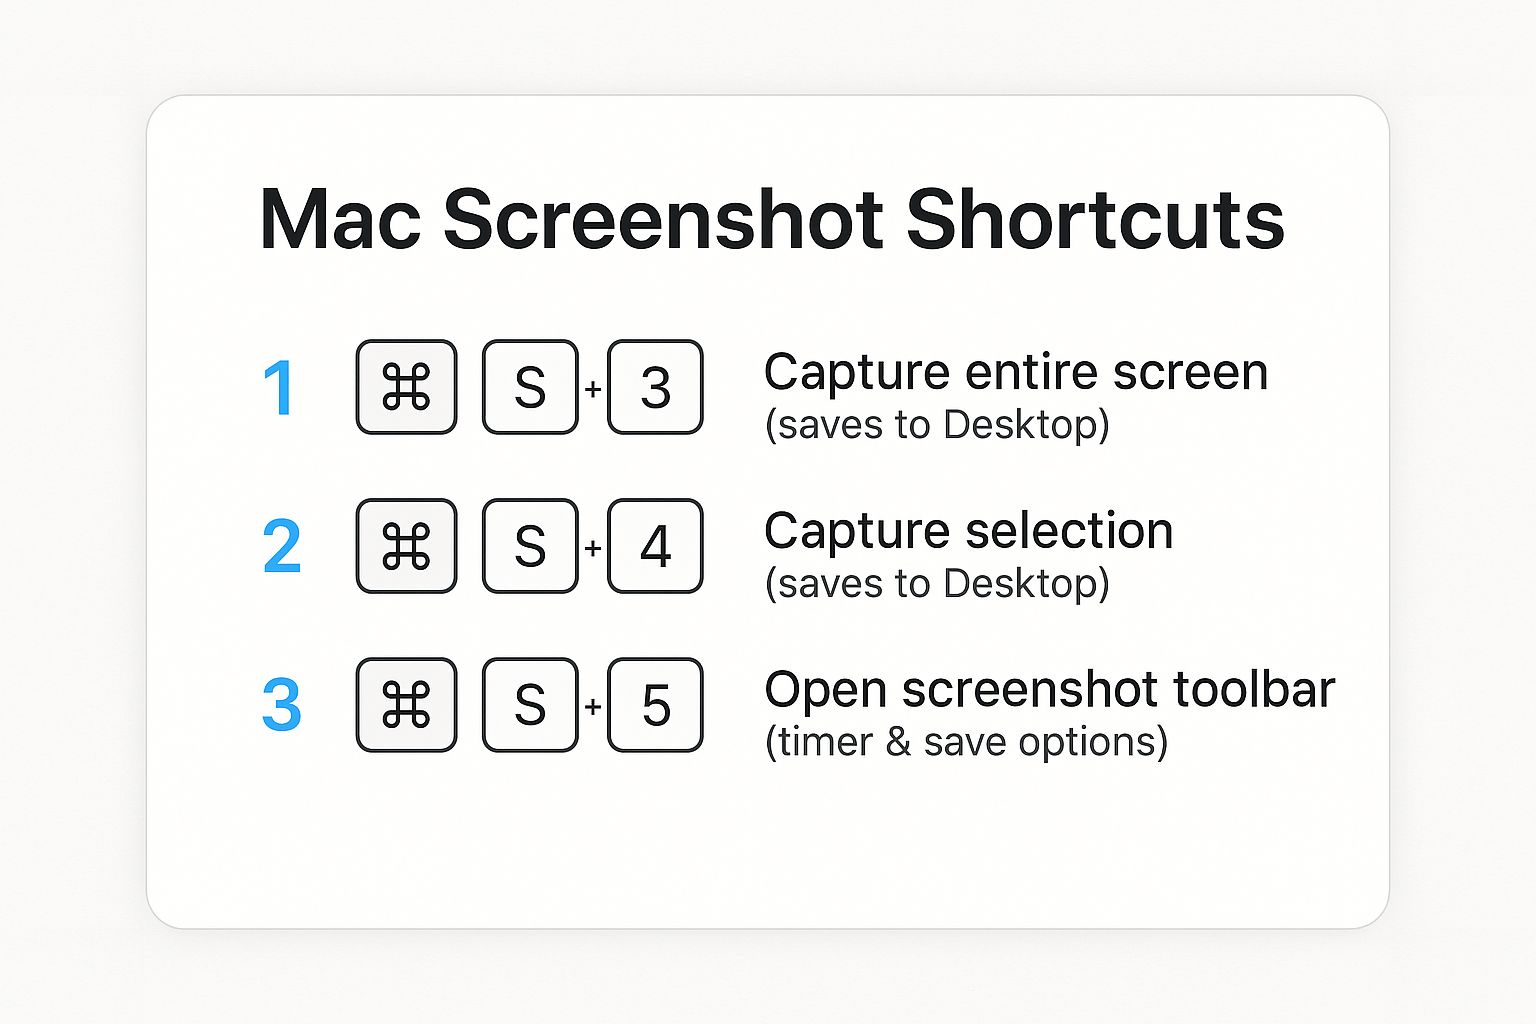
As you can see, your choice really boils down to what you need to capture. Do you need the whole screen right now? A specific portion? Or do you need more options like a timer or a different save location? The keyboard is your command center for all of it.
MacBook Screenshot Shortcuts at a Glance
To make it even easier, here’s a quick reference table. I recommend keeping this handy until the commands become muscle memory.
| Shortcut Combination | What It Captures | Best For |
|---|---|---|
| Command + Shift + 3 | The entire screen. | Quickly capturing everything visible on your display without any fuss. |
| Command + Shift + 4 | A specific, user selected portion of the screen. | Grabbing a single chart, paragraph, or app feature without extra clutter. |
| Command + Shift + 5 | Opens the Screenshot toolbar for advanced options. | Screen recording, timed screenshots, or changing where your files save. |
Once you’ve used these a few times, you'll wonder how you ever worked without them. They're a fundamental part of a smooth macOS workflow.
Capturing a Precise Area of Your Screen
Let's be honest, sharing your entire screen is rarely the best move. It’s messy. You’ve got your dock, a dozen browser tabs, and other clutter that just distracts from the point you're trying to make.
Isolating the exact piece of information you want to share is cleaner, more professional, and gets your message across way faster. This is where one of my most used Mac shortcuts comes in: Command + Shift + 4. This little combo is a game changer for daily productivity and essential for creating focused app store visuals.

Hit those three keys, and your cursor instantly morphs into a crosshair. From there, just click and drag a box around whatever you need to capture. The moment you let go of the mouse button, a perfectly cropped image saves right to your desktop. No follow up editing needed.
This is my go to method for grabbing a specific chart from a dense report or pulling a single customer quote from a long webpage. It’s quick, clean, and efficient.
Fine-Tuning Your Selection on the Fly
What happens if you don't draw the perfect box on your first attempt? It happens to all of us. You don't have to cancel and start over. The screenshot tool has a few hidden tricks that let you adjust your selection before you even capture the image.
Once you’ve started dragging your selection box, you can use these keys to get it just right:
- Move the Entire Selection: Hold down the spacebar (while still holding the mouse button) and you can move the entire box around the screen. This is perfect for repositioning it without having to redraw.
- Lock a Dimension: Hold down the Shift key to lock the selection's movement to either the horizontal or vertical axis. I use this all the time for capturing a tall, narrow column of text or a wide, skinny banner ad.
These subtle adjustments are the secret to creating crisp, professional looking screen captures. Taking an extra second to perfect your selection saves you the headache of cropping later. This is especially true when you're creating high converting app store screenshots, where every single pixel counts.
Think about it. If you're building a tutorial, you can capture just the menu you want to highlight instead of the whole application window. For example, when mocking up app store visuals for a new feature, use this technique to isolate that feature, making sure it grabs all the attention and drives more conversions. This simple shortcut gives you pixel perfect control, every single time.
Your Screenshot Command Center: Command + Shift + 5
When you need more than a quick click and drag, Command + Shift + 5 is your best friend. This shortcut brings up a powerful little toolbar that’s the key to making your screenshot workflow faster and way more professional. Forget basic captures; this is your command center.
From this one spot, you can instantly switch between grabbing the whole screen, a specific window, or a custom area. But the real magic is tucked away in the options, where you can save yourself a ton of busywork down the line.
Fine-Tuning Your Captures
The "Options" menu is where this tool really shines. You can tweak settings that completely change how you work, especially if you’re creating something like app store assets where every shot needs to be just right.
Right from the toolbar, you can:
- Set a Timer: Give yourself a 5 or 10 second countdown. This is a lifesaver for grabbing things like dropdown menus or tooltips that vanish the second you click away.
- Change Where It Saves: Stop cluttering your Desktop. You can tell your Mac to send screenshots straight to a project folder, into Documents, or my personal favorite, right to your clipboard for instant pasting.
- Show the Mouse Pointer: Need to show exactly where to click in a tutorial? Just toggle this on to include your cursor in the shot. It’s a small thing that makes how to guides so much clearer.
For instance, if I'm prepping a new set of high converting app store screenshots for an iOS or Android release, I'll set the save location to an "App Store Assets" folder. Everything lands exactly where I need it, organized and ready to go. No more hunting around.
Sending captures straight to your clipboard is a total game changer. You can snag a piece of your app's UI and drop it directly into a Slack message for your team or into a design tool like ScreenshotWhale's editor without ever creating a file. It’s incredibly efficient.
More Than Just Static Images
This little toolbar isn't just for pictures; it’s also your go to for screen recording. You can record your whole screen or just a section of it, which is perfect for showing a software bug to your support team or whipping up a quick demo video for social media.
While plenty of third party tools exist, Apple's built in recorder is what most people reach for first. And as more people join the ecosystem, Mac revenue hit a staggering $9.0 billion in Q1 2025, thanks to the new M3 powered MacBooks, mastering these native tools is becoming essential. You can learn more about the trends driving MacBook Pro growth to see why so many users are sticking with what’s built in.
Getting comfortable with this toolbar is what separates a casual user from a true power user.
Editing and Annotating Your Screenshots Instantly
A raw screenshot is often just the beginning. The real power comes from turning that simple image into a clear, actionable piece of communication.
You’ve probably noticed it: right after you take a screenshot on your Mac, a small thumbnail pops up in the corner of your screen for a few seconds. Most people just let it disappear, but clicking on it is the secret to instant edits.
That click is your direct gateway to the Markup tool. This isn’t some separate app you need to hunt down and open; it’s an immediate editing suite that lets you add context and focus right on the spot.
This is perfect for drawing attention to specific details without a lot of fuss. Need to point out a new feature in a software mock up? Use a bright red arrow. Want to add a quick note for your team before dropping it in Slack? A text box does the trick in seconds.
Making Your Screenshots Clear and Professional
The Markup tool gives you a focused set of features designed for quick, effective edits. You can crop out the irrelevant parts of the image to really hone in on what matters, or use shape tools to block out sensitive information like names or email addresses before sharing.
Some of the most useful tools you'll find are:
- Shapes and Arrows to pinpoint exact locations.
- Text Boxes for adding explanatory captions or steps.
- Highlighter Pen to emphasize important phrases.
- Magnifier Loupe to zoom in and highlight tiny details.
This immediate editing capability is a game changer, especially for creating high converting app store screenshots. For instance, as of 2025, Apple’s App Store hosts about 1.9 million apps, and their guidelines demand actual in app captures. Using Markup, you can add vibrant callouts to highlight your app's best features directly on those captures, a small step that can seriously boost conversions. For more on this, check out these insights on Apple's App Store statistics and guidelines.
I love turning a plain screen capture into a mini tutorial by adding numbered steps with the text tool. This transforms a simple screenshot into a powerful visual guide that’s way clearer than just typing out instructions. It’s an effective way to showcase app functionality for the iOS and Android stores.
Once you’ve added your annotations, sharing is dead simple. You can save the edited image or hit the share button to send it directly to an email or message. To streamline this process even further, check out our guide on how to upload a screenshot for just about any platform.
Pro Tips for a Faster Screenshot Workflow
Getting truly quick with screenshots on a Mac is all about moving beyond the basics. A few power user tricks can save you countless clicks and seriously speed up your daily process.
One of the best habits you can build is sending captures straight to your clipboard instead of saving them as files. I do this all the time. Just add the Control key to your usual shortcuts.
So, Command + Control + Shift + 4 lets you select an area and immediately paste it into a Slack message, email, or document. This single trick stops your desktop from getting cluttered with "Screen Shot 2024..." files and makes sharing instant.
Creating Polished Screenshots
When you’re making visuals for professional use, think of things like high converting app store screenshots or a clean slide deck, the little details really matter.
The default drop shadow that macOS adds to window captures can sometimes look dated or just get in the way of a clean design.
To grab a window without the shadow, use Command + Shift + 4, hit the Spacebar to enter window capture mode, then hold down the Option key as you click on the window. The result is a crisp, flat image that slides perfectly into presentations or your app store page layout. This technique is invaluable for creating clean, professional assets for both the iOS and Android stores.
And for those on older MacBooks, you can even capture your Touch Bar by pressing Command + Shift + 6.
While the built in tools are surprisingly powerful, sometimes a project just needs more horsepower. Third party apps like CleanShot X are a worthwhile investment for heavy users, offering advanced features like scrolling captures, cloud syncing, and way better annotation tools.
These tips will help you work faster and produce more polished results. If you’re also juggling different devices, the same ideas around efficiency apply. You can check out our guide on how to screenshot with an iPad to keep your workflow smooth across the whole Apple ecosystem.
Got Questions? Let's Troubleshoot Your MacBook Screenshots
Even after you've got the basic shortcuts down, a few common questions always seem to pop up. Nailing these little details will make your screenshot workflow feel effortless.
One of the first things people wonder is, "Where did my screenshot just go?" By default, your Mac drops every single capture right onto your Desktop. The file is automatically named with the date and time, which is handy but can get messy fast.
If your desktop is starting to look like a digital junk drawer, it's an easy fix. Just bring up the screenshot toolbar with Command + Shift + 5, click on "Options," and pick a new home for your files under the "Save to" menu. I personally have a dedicated "Screenshots" folder to keep things tidy.
Solving Common Glitches
What happens if your trusty screenshot shortcuts suddenly decide to take a day off? Before you start thinking about a trip to the Genius Bar, take a deep breath and check your settings.
Head over to System Settings > Keyboard > Keyboard Shortcuts > Screenshots. Make sure everything is checked and the shortcuts haven't been accidentally changed. Sometimes other apps, like Dropbox, can hijack these commands, so that's another thing to look out for. And honestly? A quick restart often magically fixes these kinds of temporary hiccups.
The default PNG format is fantastic for quality, but the files can be a bit beefy. If you need something smaller like a JPG, you can change the default with a quick Terminal command:
defaults write com.apple.screencapture type jpg. Just type that in, press Enter, and all your future screenshots will save as JPGs.
Customizing Your Captures on the Fly
Another question I hear a lot is about that soft drop shadow macOS adds to window captures. When you use Command + Shift + 4 then hit the Spacebar, you get that slick, professional looking shadow. It's great for most things, but not always what you want.
If you need a clean, flat image without any effects, perfect for dropping into a presentation or a design mockup, there’s a simple trick. Just hold down the Option key as you click to capture the window. The shadow vanishes. This is a must know trick for creating high quality, conversion focused app store screenshots.
Mastering these small tweaks gives you total control, letting you grab exactly the image you need in the moment. The core idea is always a quick, clean capture, and that principle applies no matter what device you're on. For more tips, check out our guide on how to capture a screenshot on iPhone to round out your skills.
Ready to create stunning, high-converting visuals for your mobile app? With ScreenshotWhale, you can design professional App Store and Google Play screenshots in minutes using our powerful editor and beautiful templates. Try ScreenshotWhale for free and boost your app's growth today!
Generate your store screenshots in minutes
Upload raw app screenshots and let AI produce polished, localized App Store and Google Play sets.
Try the generator free