How to take screenshot in ipad: The Complete Guide
Learn how to take screenshot in ipad with simple steps, shortcuts, Apple Pencil tips, full-page captures, and pro editing tricks.
Grabbing a screenshot on your iPad is one of those things you'll do all the time once you know how. It’s a core skill, really, whether you're saving a flight confirmation, sharing a hilarious text thread, or trying to show tech support exactly what’s going wrong on your screen.
The good news is, it only takes a second.
Your Instant Guide to Capturing Your iPad Screen
The go to method for most people involves a quick press of the physical buttons. Which buttons you use, though, depends entirely on which iPad model you have.
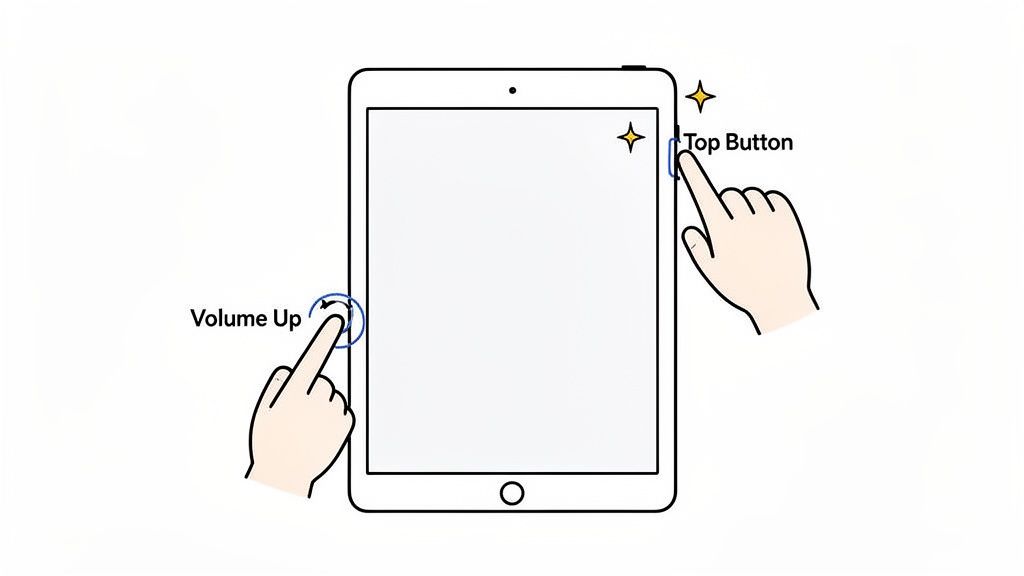
- For newer iPads with Face ID (like the iPad Pro or modern iPad Air), you'll press and quickly release the Top button and the Volume Up button at the same time.
- For iPads with a classic Home button (like older iPad or iPad mini models), you'll press and quickly release the Top button and the Home button simultaneously.
It's a subtle difference, but it's the key to getting a quick, clean capture every time.
Of course, the buttons aren't your only option. Apple has built in a few other handy ways to get the shot. If you're an Apple Pencil user, you can swipe up from a corner of the screen. Or, for a more accessibility focused approach, you can set up a custom on screen button using AssistiveTouch.
This kind of flexibility is pretty common across different devices. You can see similar ideas in our broader guide on how to take a screenshot on a tablet for a look at how other platforms handle it.
To make things even clearer, this chart breaks down the main methods at a glance.
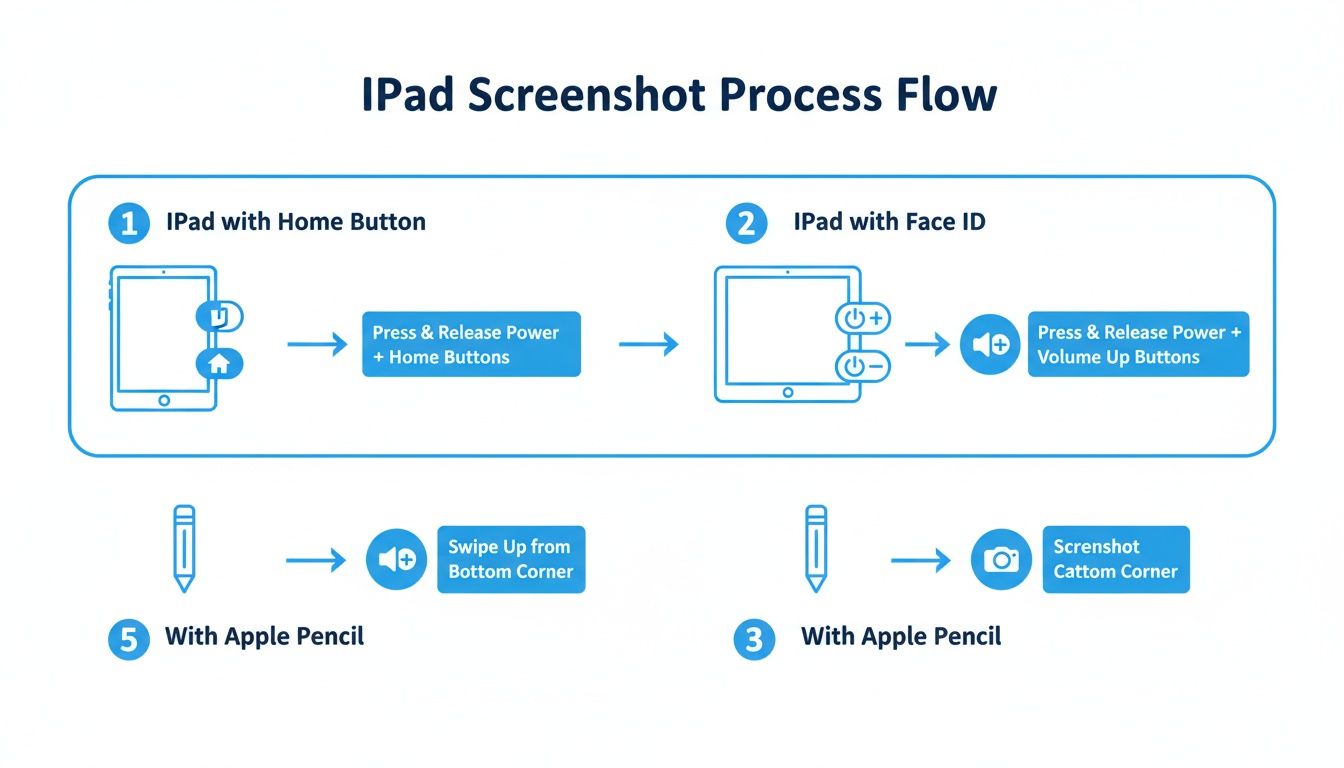
As you can see, it all boils down to your iPad's hardware. Knowing whether you have a Home button or Face ID is the first step to mastering your device's screenshot capabilities.
iPad Screenshot Methods at a Glance
Need a quick refresher? Here’s a simple table to help you remember the right button combo for your specific iPad. I find this is the easiest way to keep it straight, especially if you switch between different models.
| iPad Model Type | Button Combination | Best For |
|---|---|---|
| Face ID Models (e.g., iPad Pro, newer iPad Air) | Top Button + Volume Up Button | Quick, one handed captures on modern iPads without a Home button. |
| Touch ID Models (e.g., older iPads, iPad mini) | Top Button + Home Button | The classic method for iPads that still have the physical Home button. |
Think of this table as your cheat sheet. Once you've done it a few times, the right combination becomes pure muscle memory.
Mastering the Essential Screenshot Shortcuts
Taking a screenshot on an iPad really just boils down to knowing which two buttons to press. The exact combination depends on your model, but once you get the muscle memory down, it's instant. Honestly, using the physical buttons is the fastest way to capture what's on your screen, period.
For any modern iPad with Face ID, think the recent iPad Pro, iPad Air, and iPad mini models, the move is simple. You'll press and immediately release the Top button and the Volume Up button at the same time. The trick is to make it a quick, sharp press. If you hold them down for too long, you’ll just end up on the power off screen instead.
This quick gesture has become a core part of how we use our devices. With people globally spending around 6 hours and 38 minutes a day on screens, screenshots are how we save everything from funny memes to important receipts. If you're curious about screen time trends, Exploding Topics has some fascinating data on these habits.
The Classic Home Button Method
If your iPad still rocks a physical Home button, you'll see this on older iPad, iPad Air, and iPad mini generations, the shortcut is just a little different. For these models, you'll press and release the Top button and the Home button simultaneously. Again, keep it quick, or you might accidentally trigger Siri.
No matter which button combo you use, the result is identical. The screen gives a quick white flash, and you'll hear that familiar camera shutter sound (if your volume is up). A moment later, a small thumbnail of your screenshot pops into the bottom left corner of your screen.
Pro Tip: Don't just ignore that little thumbnail preview! Tapping it immediately throws you into the Markup editor. This is your chance to crop, doodle, or add text before the image even hits your photo library. If you let it be, it'll vanish after a few seconds and save itself to your Photos app.
This instant feedback is great because it not only confirms the capture worked but also puts some powerful editing tools just a tap away.
Beyond the Buttons: Advanced Screenshot Techniques
Sure, the button combos get the job done, but your iPad has some seriously clever ways to grab a screenshot that can feel a lot more natural depending on what you're doing. Think of these as pro moves, perfect for everything from quick annotations with an Apple Pencil to capturing something completely hands free.
For anyone who uses an Apple Pencil, there’s a gesture you’ll wonder how you lived without. Just swipe up from either the bottom left or bottom right corner of your screen. That’s it. In one fluid motion, you've not only taken a screenshot but also opened it directly in the Markup view, ready for your notes and drawings. It's incredibly fast for marking up lecture slides or giving feedback on a design mockup.
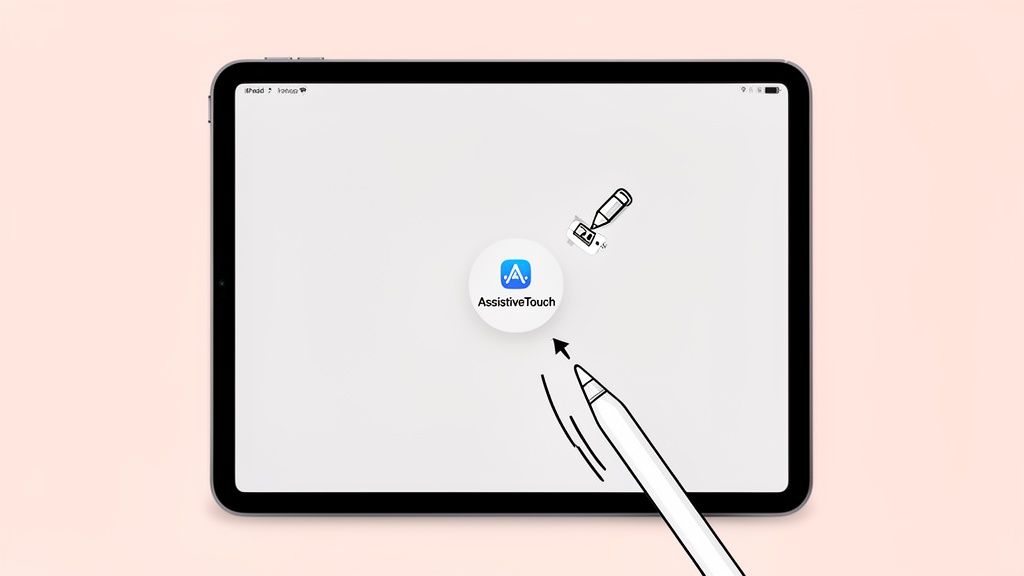
Accessibility and Hands-Free Captures
Another fantastic option is hiding in your iPad’s accessibility settings: AssistiveTouch. This feature puts a little floating menu button on your screen that you can customize to do almost anything, including taking a screenshot with a single tap. No more fumbling with physical buttons.
Here’s how to turn it on:
- Navigate to Settings > Accessibility > Touch > AssistiveTouch.
- Toggle it on.
- Under the "Custom Actions" section, you can assign "Screenshot" to a single tap, double tap, or long press.
This is a game changer for anyone who finds the button combinations tricky or just wants a super fast, one touch solution. We dive even deeper into accessibility options in our guide to taking screenshots on an iPad Pro.
And for moments when your hands are totally full? Siri is your best friend. Just say, "Hey Siri, take a screenshot." Siri will confirm it heard you and snap a picture of whatever’s on your screen. This is perfect for when you’re following a recipe in the kitchen or in the middle of a presentation.
Comparing Advanced Screenshot Methods
To help you decide which trick to pull out of your bag, here’s a quick look at these alternative methods, what they’re best for, and how they work.
| Method | How It Works | Ideal Use Case |
|---|---|---|
| Apple Pencil | Swipe up diagonally from a bottom corner with the Pencil. | Instantly annotating or drawing on what you've captured. |
| AssistiveTouch | Tap a custom on screen button. | One touch captures or for users who find button combos difficult. |
| Siri | Use the voice command, "Hey Siri, take a screenshot." | Completely hands free operation when you can't touch the screen. |
| Keyboard Shortcut | Press Shift-Command-3 on an external keyboard. | A familiar workflow for those coming from a Mac. |
Each of these methods offers a unique advantage, turning a simple screen capture into a seamless part of your iPad experience.
Keyboard Pro Tip: If you use a Magic Keyboard or another external keyboard, you can fall back on the classic macOS shortcut. Pressing Shift-Command-3 snaps the whole screen instantly. Want to jump right into editing? Use Shift-Command-4 instead to take the screenshot and open the Markup editor in one go.
Once you start exploring these alternatives, you'll find the perfect technique for any situation. Whether it's a quick swipe of the Pencil, a custom tap on the screen, or a simple voice command, there's always a smarter way to take a screenshot on your iPad.
Sometimes, what you see on the screen is just the tip of the iceberg. You need to capture an entire article for offline reading, save a long email thread for your records, or grab a full webpage design to send to a client. A standard screenshot just won’t cut it.
That’s where the iPad’s slick Full Page screenshot feature comes in. It’s a game changer for capturing everything, not just the visible part.
First, get the content you need on your screen in an app like Safari, Notes, or Mail. Go ahead and take a screenshot just like you normally would. For most modern iPads, that’s the Top button + Volume Up combo. As soon as that little thumbnail preview pops up in the corner, tap it. Don't let it disappear!
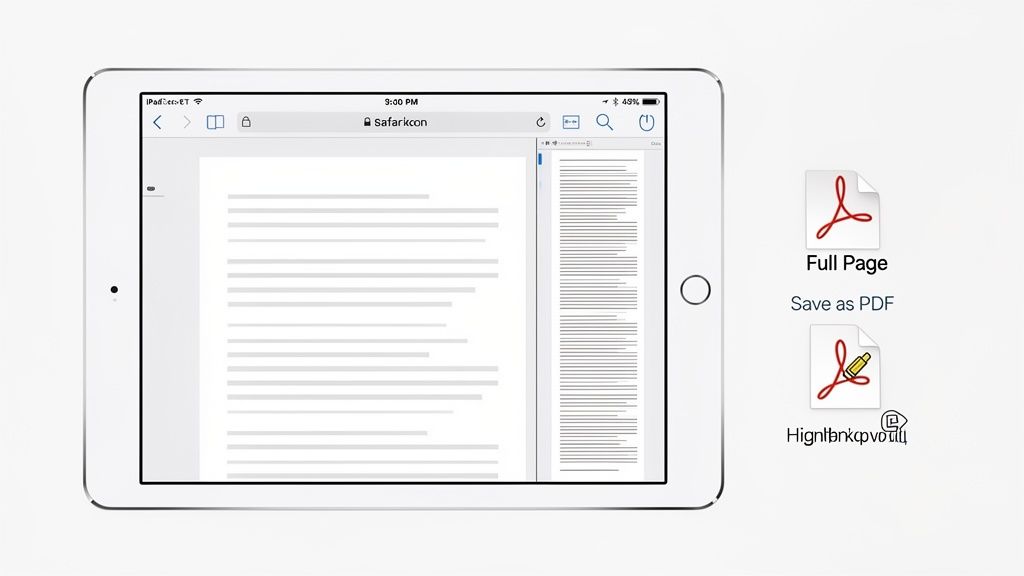
From Image to Document
Once you're in the editing screen, look at the top. You'll see two tabs: "Screen" and "Full Page." Give Full Page a tap. Instantly, you’ll see the entire scrollable webpage or document appear in a preview pane on the right.
I find myself using this all the time for a few key things:
- Saving articles for later. Perfect for grabbing long reads to look at on a flight without Wi Fi.
- Archiving important info. I use it to keep a perfect copy of online receipts, booking confirmations, or critical email chains.
- Sharing design feedback. You can capture a whole webpage, mark it up with notes, and send it off to a designer or client in one clean file.
From here, you have all the usual Markup tools at your disposal. You can circle key stats with the pen, drag the highlighter over important quotes, or drop in text notes for more detailed feedback.
This feature elevates a simple screenshot from a static image into a multi page document. By saving it as a PDF, you get a clean, universally accessible file that’s perfect for both professional work and personal archiving.
When your edits are done, tap "Done" in the top left corner. You’ll get an option to Save PDF to Files. This is a key difference: full page captures are saved as PDFs in your Files app, not as images in your Photos library. It's a much better way to keep these kinds of documents organized and ready to share.
Taking a screenshot is just the first step. The magic is what you do with it afterward.
As soon as you grab a screen capture on your iPad, a little thumbnail pops into the corner. My advice? Tap it immediately. This opens up the Markup editor, which is basically your command center for turning a static image into something genuinely useful.
Inside Markup, you’ve got a whole toolbox. You can drop a magnifier on a tiny detail you want someone to notice, add text to explain what's going on, or even use the pen tool to quickly sign a document. It’s perfect for giving clear feedback on the fly without having to hunt for another app.
Sharing and Organizing Like a Pro
Here’s one of my favorite time saving tricks: you can share a screenshot without ever saving it to your camera roll. After you’ve made your edits in Markup, tap the Share icon instead of hitting "Done." This lets you fire it off via AirDrop, Messages, or Mail, and then you can just discard the original. It’s a brilliant way to keep your Photos library from getting clogged up with one off captures. If you want a deeper dive into sharing, our guide on how to upload a screenshot has some great pointers.
The good news is that iPadOS does the organizing for you. Every screenshot you save automatically lands in a dedicated "Screenshots" album inside the Photos app, so they won't get mixed in with your family pictures.
Apple keeps making screenshots smarter, too. In recent versions of iPadOS, the software can actually recognize text, objects, and even events within your captures. This turns them from simple images into interactive starting points for a web search or a new calendar entry. You can read more about how this is changing UI design over on MacRumors. This kind of built in intelligence makes knowing how to screenshot on an iPad more valuable than ever.
Common Questions About iPad Screenshots
Even a simple task like taking a screenshot can throw up a few curveballs. It’s usually straightforward, but getting the small details right makes everything smoother, especially when you're in a hurry to capture something.
Let's clear up a few of the most common questions I hear.
"Where Did My Screenshot Go?"
This is probably the number one question. You grab a screenshot, the thumbnail pops up, and then... where does it live?
Good news: Apple keeps this incredibly organized. Every screenshot you take is saved automatically to your Photos app. Just open Photos, tap the "Albums" tab, and scroll down to the "Media Types" section. You'll see a dedicated album labeled "Screenshots" right there, keeping all your captures separate from your camera roll.
"Help! My iPad Won't Take a Screenshot."
It happens. You press the buttons, and nothing. Don't panic. It's almost always a simple fix.
More often than not, it's a timing issue. You have to press the correct button combination at the same time and then release them quickly. If you hold them down too long, you might accidentally trigger Siri or the power off screen instead. It’s a quick, sharp press.
If you’re positive you’ve got the timing right and it’s still not working, a quick restart of your iPad usually clears up any minor software hiccup causing the problem.
Troubleshooting and Other Platforms
What about grabbing a still from a video? You can absolutely use any of the standard screenshot methods to capture a frame while a video is playing. Just pause it at the right moment and snap away.
However, if you want a higher quality image or need to capture motion, the built in Screen Recording feature is a much better tool for the job. You can add it to your Control Center in the Settings app for easy one tap access.
And while we're focused on the iPad here, it's always handy to know how to do these things on other devices, especially if you work in a multi platform environment. For instance, knowing how to take a screenshot on a Microsoft Surface Pro can round out your skills and save you a headache later.
Ready to create stunning, high converting visuals for your app? With ScreenshotWhale, you can design professional App Store and Google Play screenshots in minutes using our drag and drop editor and proven templates. Start designing for free!
Generate your store screenshots in minutes
Upload raw app screenshots and let AI produce polished, localized App Store and Google Play sets.
Try the generator free